What is up next for you? A quilt? A bag? A Quilt Show? ???
I’m gearing up for Paducah! AQS Quilt Week in Paducah, KY is in a couple weeks. The show runs from April 23 – 26. I will have my booth up on the 2nd floor of the Convention Center, same spot (Booth 3500)!! I’ll be doing a Learning Center talk/demo Friday, April 25 at 1pm.
Did you see the teacher announcement for Houston International Quilt Festival? I’ll be teaching Machine Sewn Bindings this year! Plus talking about Bindings in the Wednesday Sampler! I’m thrilled and honored. Please be sure to note the EARLIER dates this year. Festival will be October 9 – 12 with activities/classes starting on the 6th.
My head is swimming with to-do lists!
So how about NO Foolin’ around for tips…
What is the strangest quilt item or notion you have that was NOT made originally for quilting? These make great quilting tips!
Neat corner!Flannel covered design wall
Mine – 1. A NEW toilet bowl brush! Yep! It really is great with getting threads off of carpet. It was never used for its intended purpose, I promise! (not pictured, HA!)
2. Blue Foam Insulation board for my design wall. I cover it with flannel and hang on the wall.
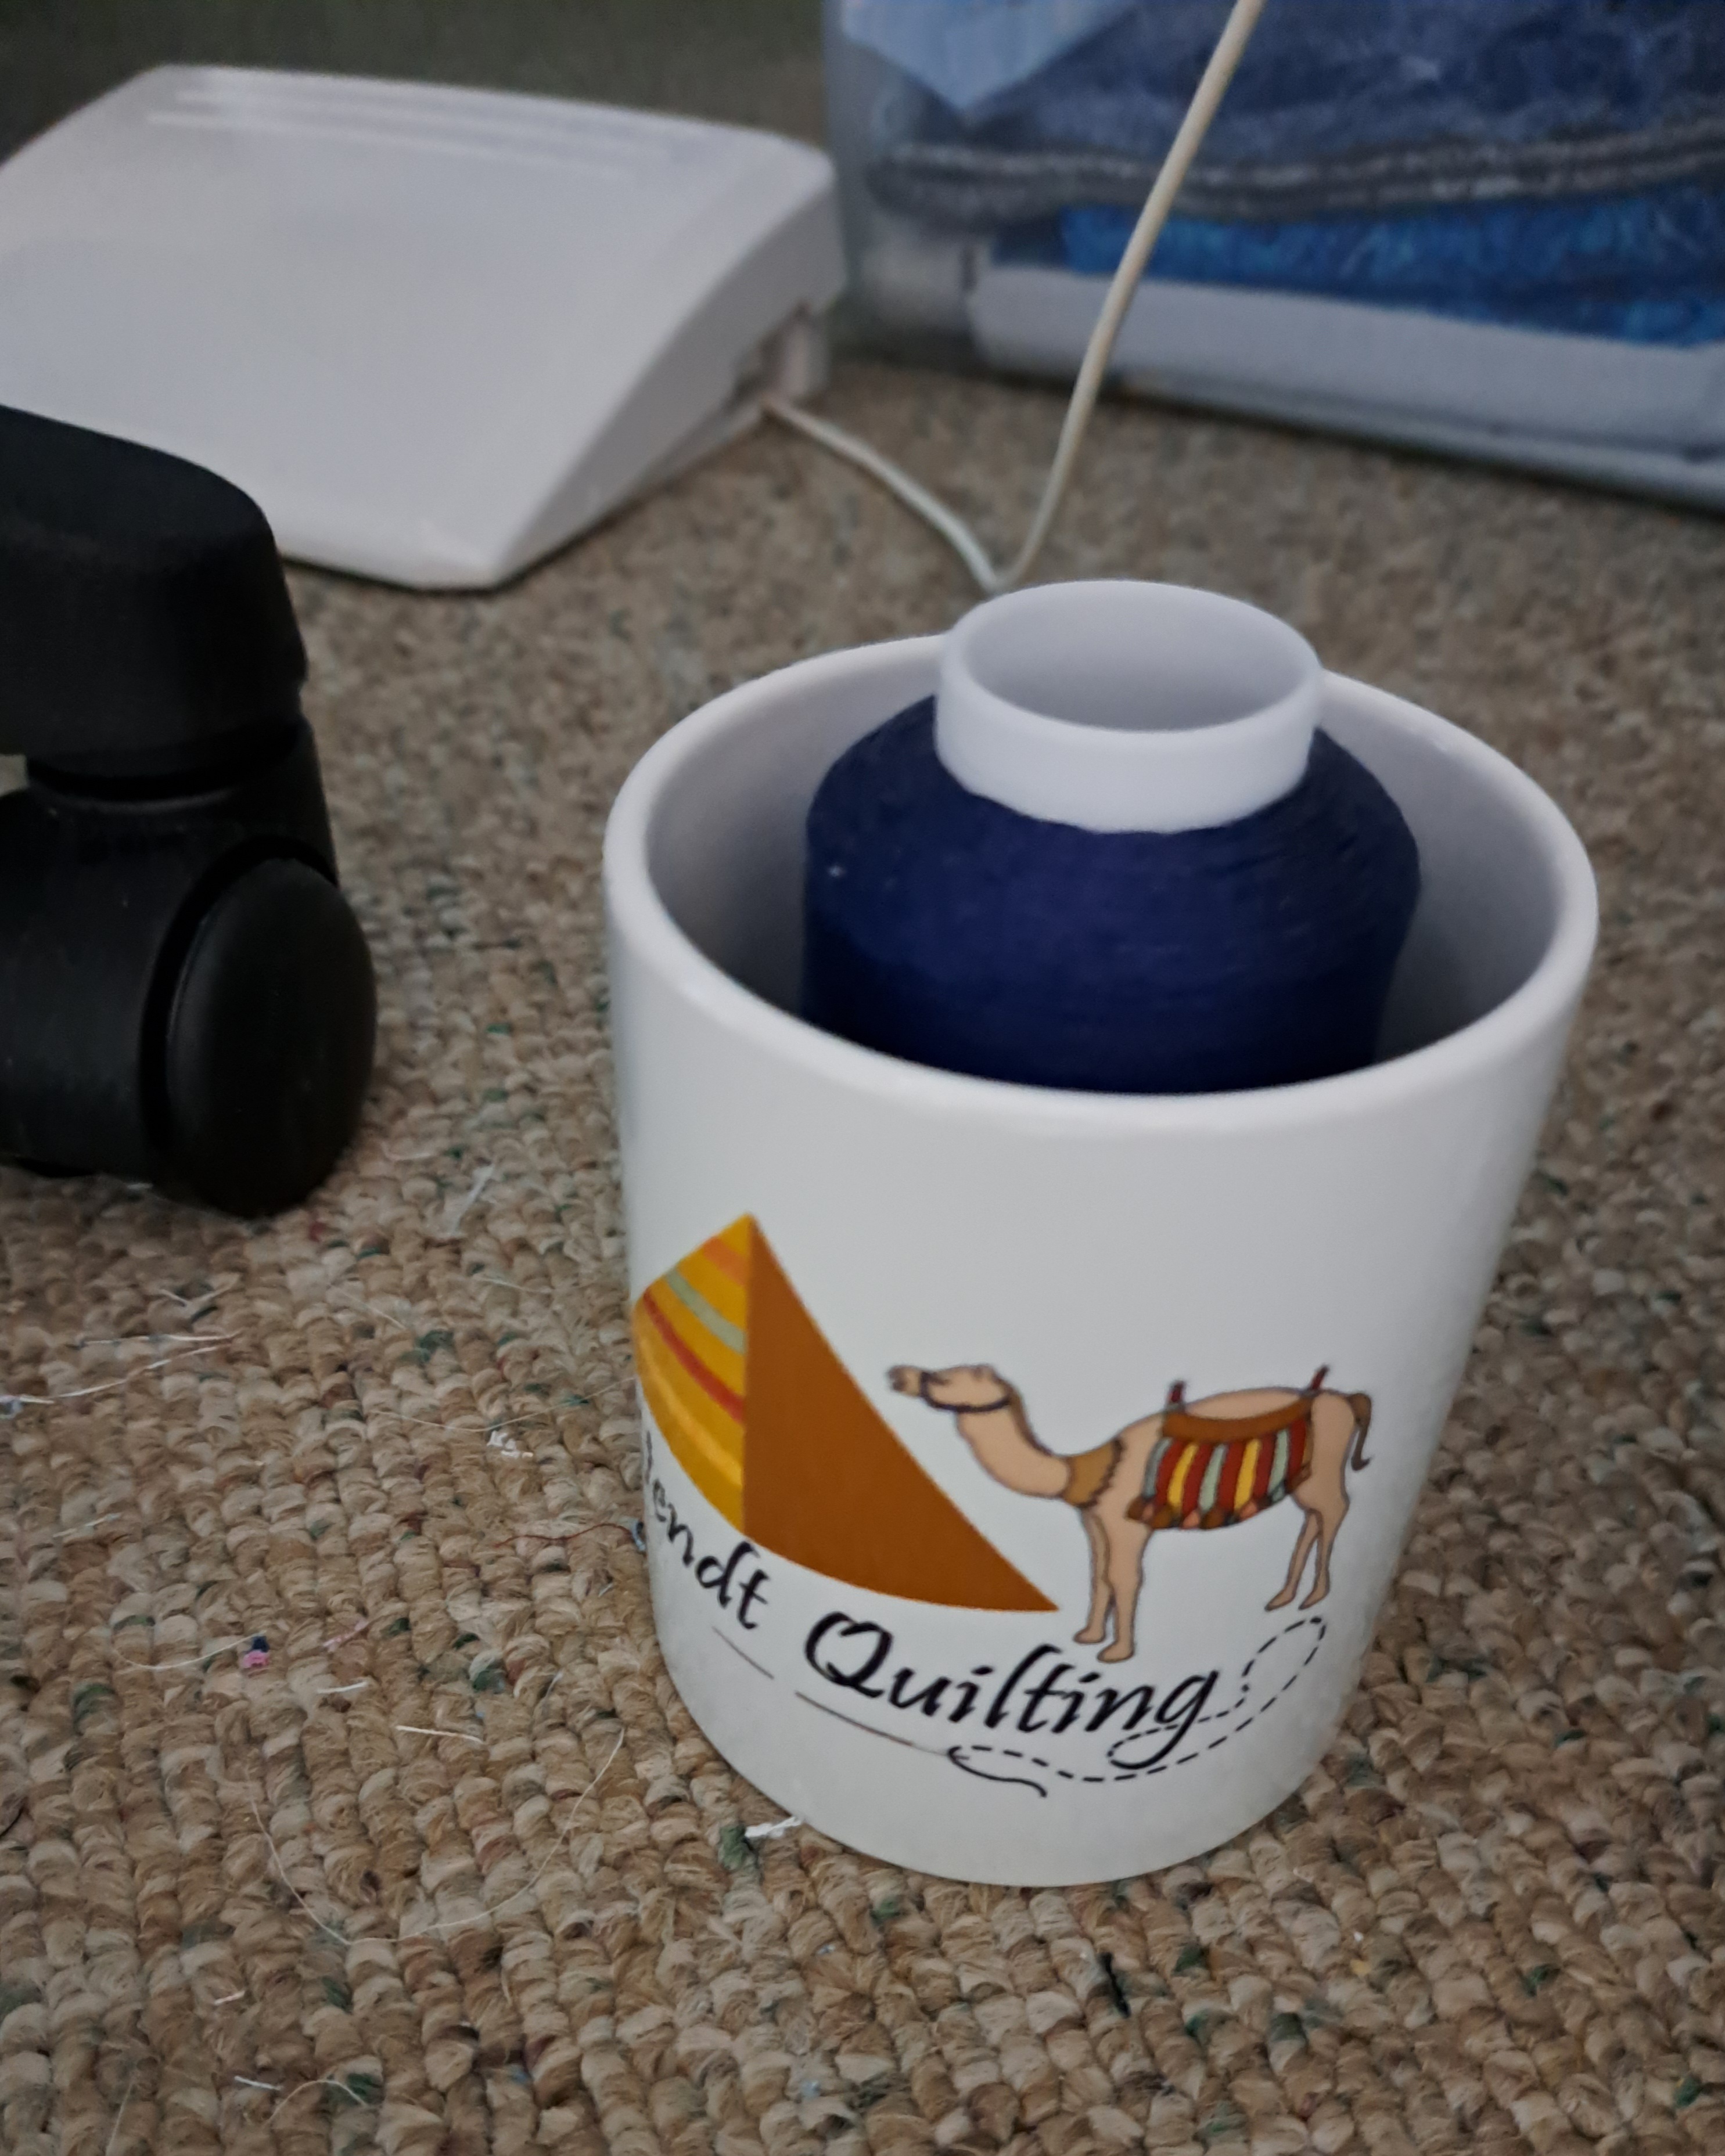
Other favorites…Blue Painter’s Tape – Lint Brush – Coffee cup for holding large spools of thread. – Silverware tray to help seam rippers, bobbins, marking pens and pencils. – 5 x 7 stand up frame cover to hold notions by my machine. – and the list goes on….
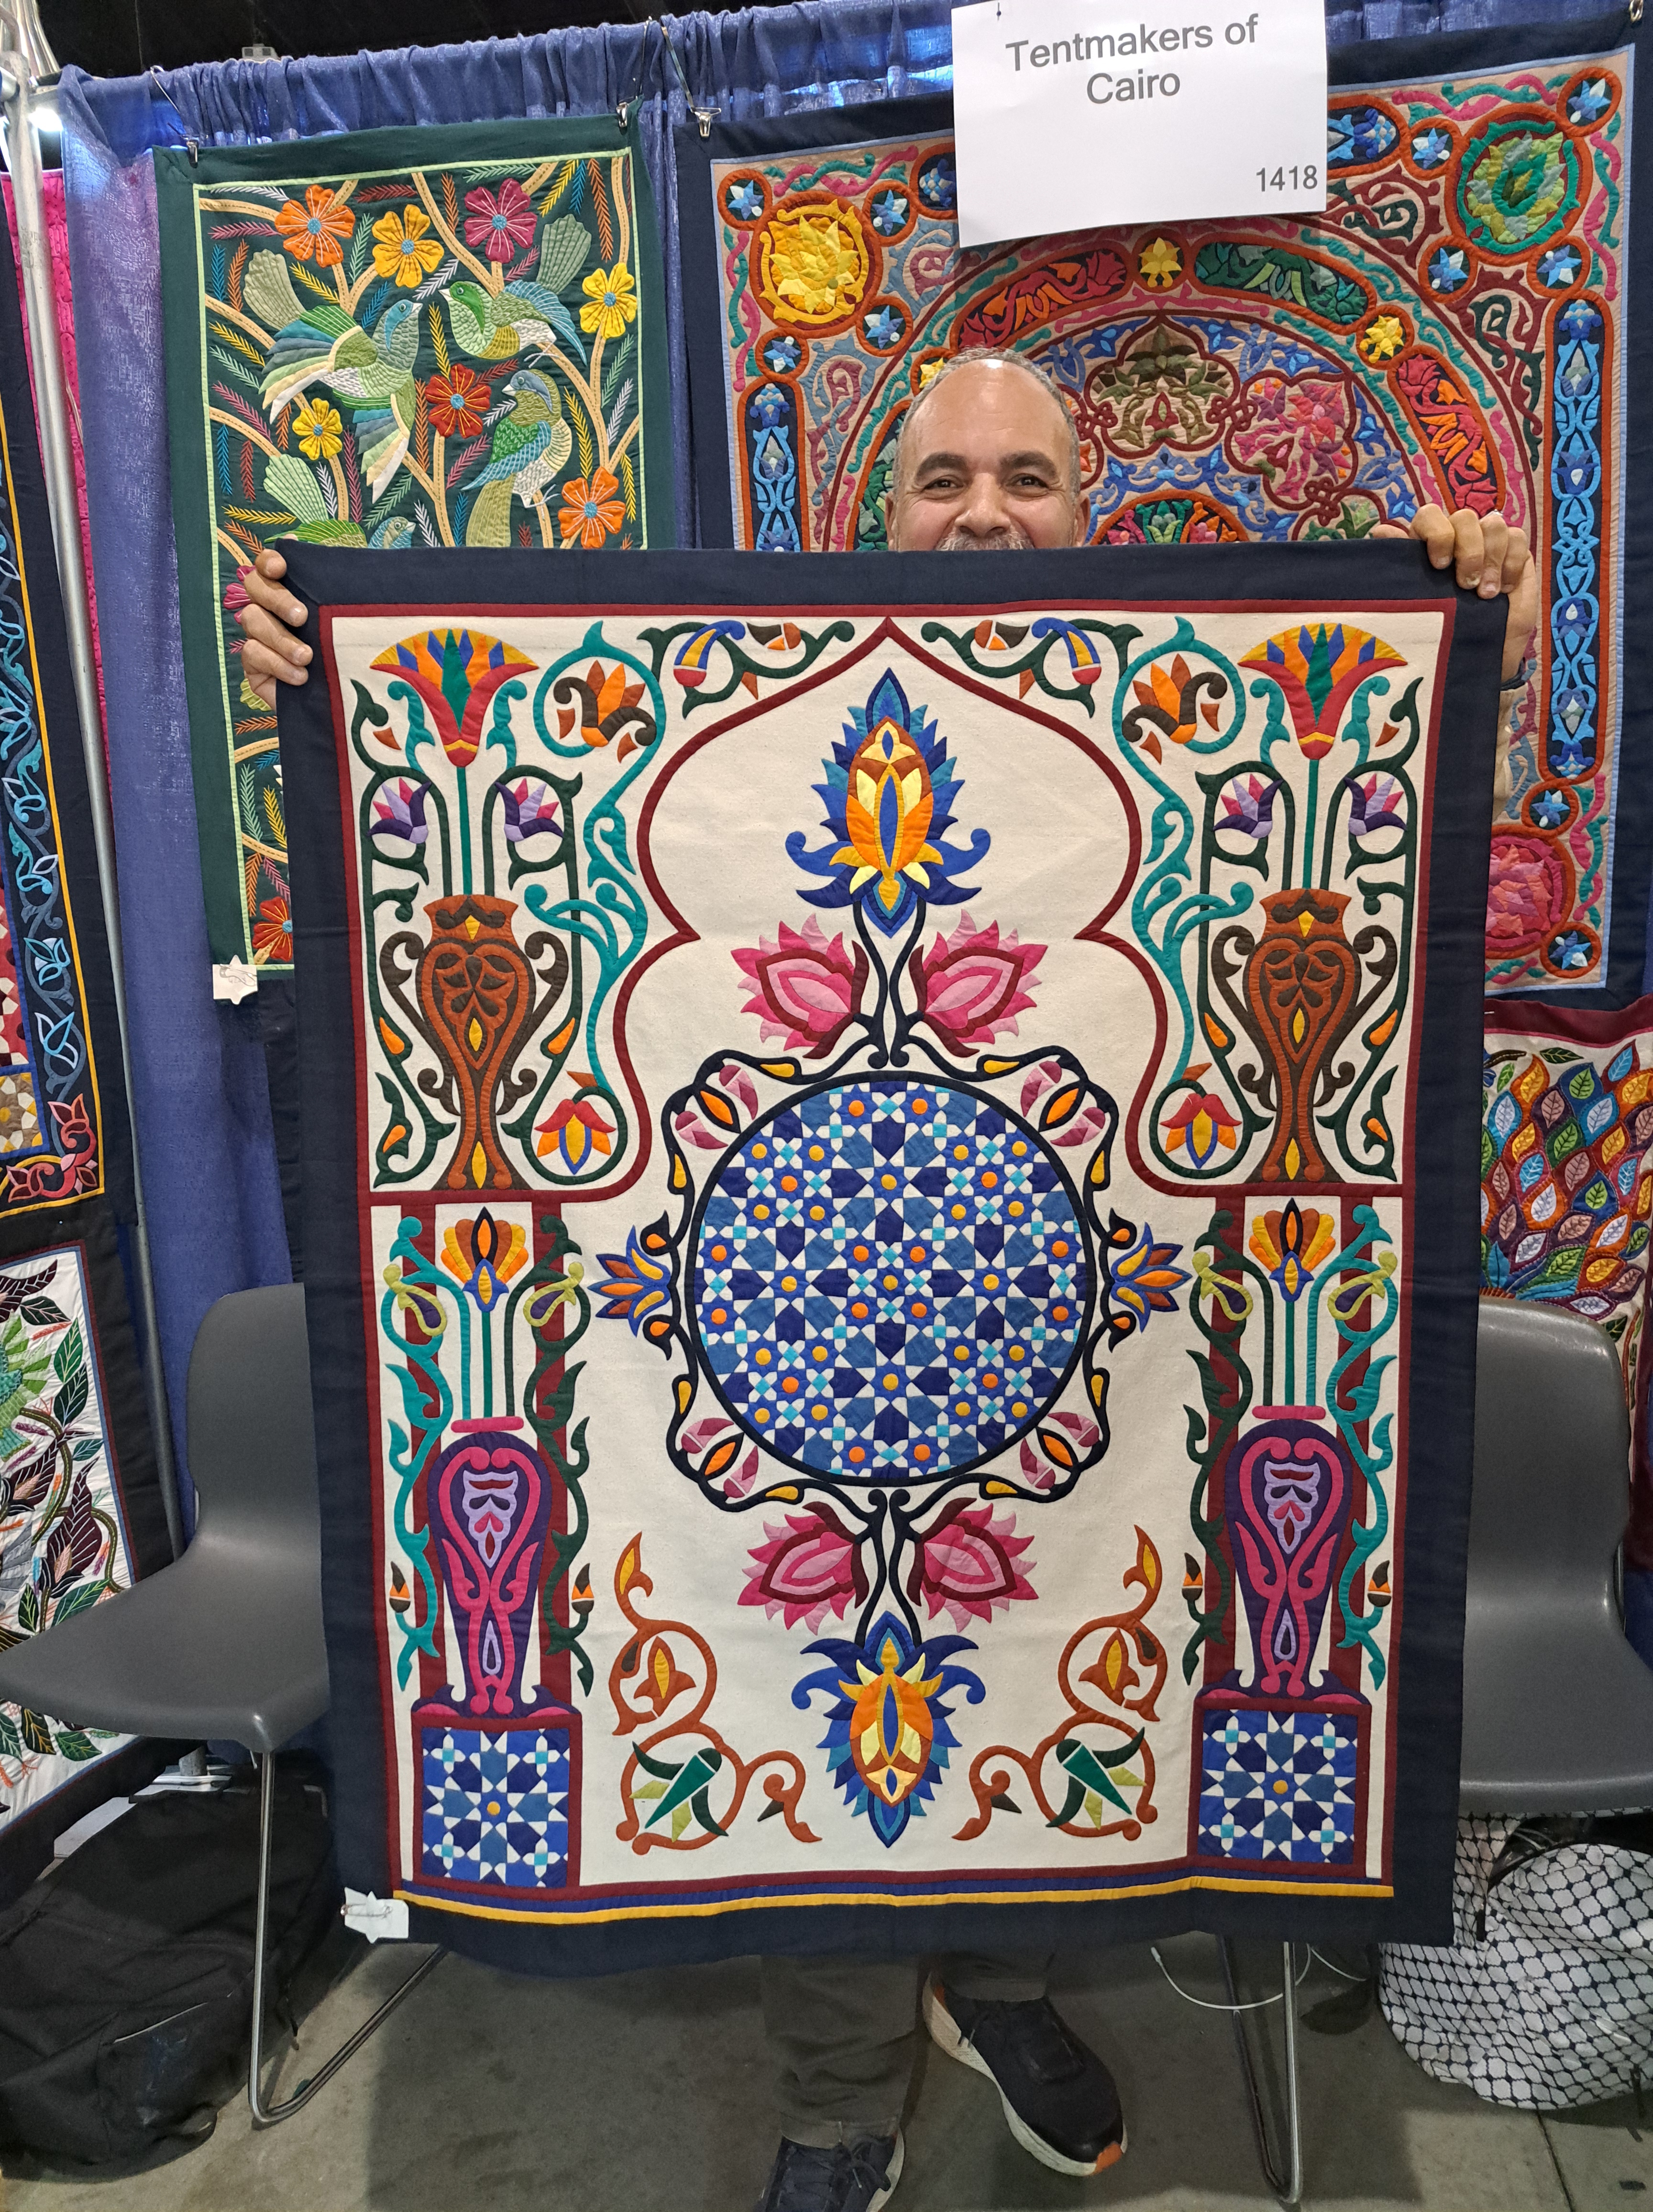
I had the joy of meeting up with one of my favorite Tentmakers from Cairo, Egypt at the Daytona Beach AQS Show. This is Tarek with one of his beautiful designs!!
I just HAD to add to my collection. I actually added two pieces. The blue lotus flowers was by Tarek and the next design was done by Hosam.
It is so difficult to decide which ones to choose. Here is another beauty!
If your guild is looking for an unusual program, look no further. I have a lecture/trunk show on the Egyptian Tentmakers Applique. I share my experience of living in Egypt and meeting the Tentmakers. I bring my beautiful pieces as well. It is always fun for me to get out these beauties and share them in person. One of the oldest forms of applique!
Tips for this week.
1 – Don’t pass up the Tentmakers at a show. They have their amazing pieces to share and sell. I love to watch them work. They are great to answer questions!
2 – BUY a Tentmaker piece. They are treasures to own and you will help support the art and lives of the Tentmakers themselves!
How many show go-ers are out there? Paducah is next for Wendt Quilting. AQS Quilt Week in Paducah, KY is April 23 – 26, 2025. Paducah is known as Quilt City USA. It is fun to see the whole town go out for the show. Store fronts will have quilt displays, hotels get fully booked and restaurants will be ready with wonderful food. The outdoor food court will have favorites…the Boy Scouts with their Strawberry Shortcake, BBQ by several food vendors and easy pick up items at many other food vendors or in the Convention Center. The BEST part of all is the QUILT VENDORS and the QUILTS! Nancy and I will be in my booth 3500 doing demos and talking everything quilting. I hope to see you there! Get all the information at AQS Quilt Week. A favorite in Paducah is the painted flood walls downtown and the National Quilt Museum. Both are very close to the Schroeder Expo Center.
March 15 is National Quilting Day. I love the logo made by Fabric Shoppers Unite.
I hope you find something quilty to do on the 15th. Or ANY day that ends in Y!!! Go out and support your local quilt shop or small quilt business!
Simple yet worthy tips this week…
#1 – Support your local quilt shop.
#2 – Find some quilty friends and do some quilting on National/Worldwide Quilting Day.
Daytona Beach AQS Quilt Week was a week and half ago. A wonderful time in my booth and class!! Thank you to great students and customers. As I’ve done before, lots of color!
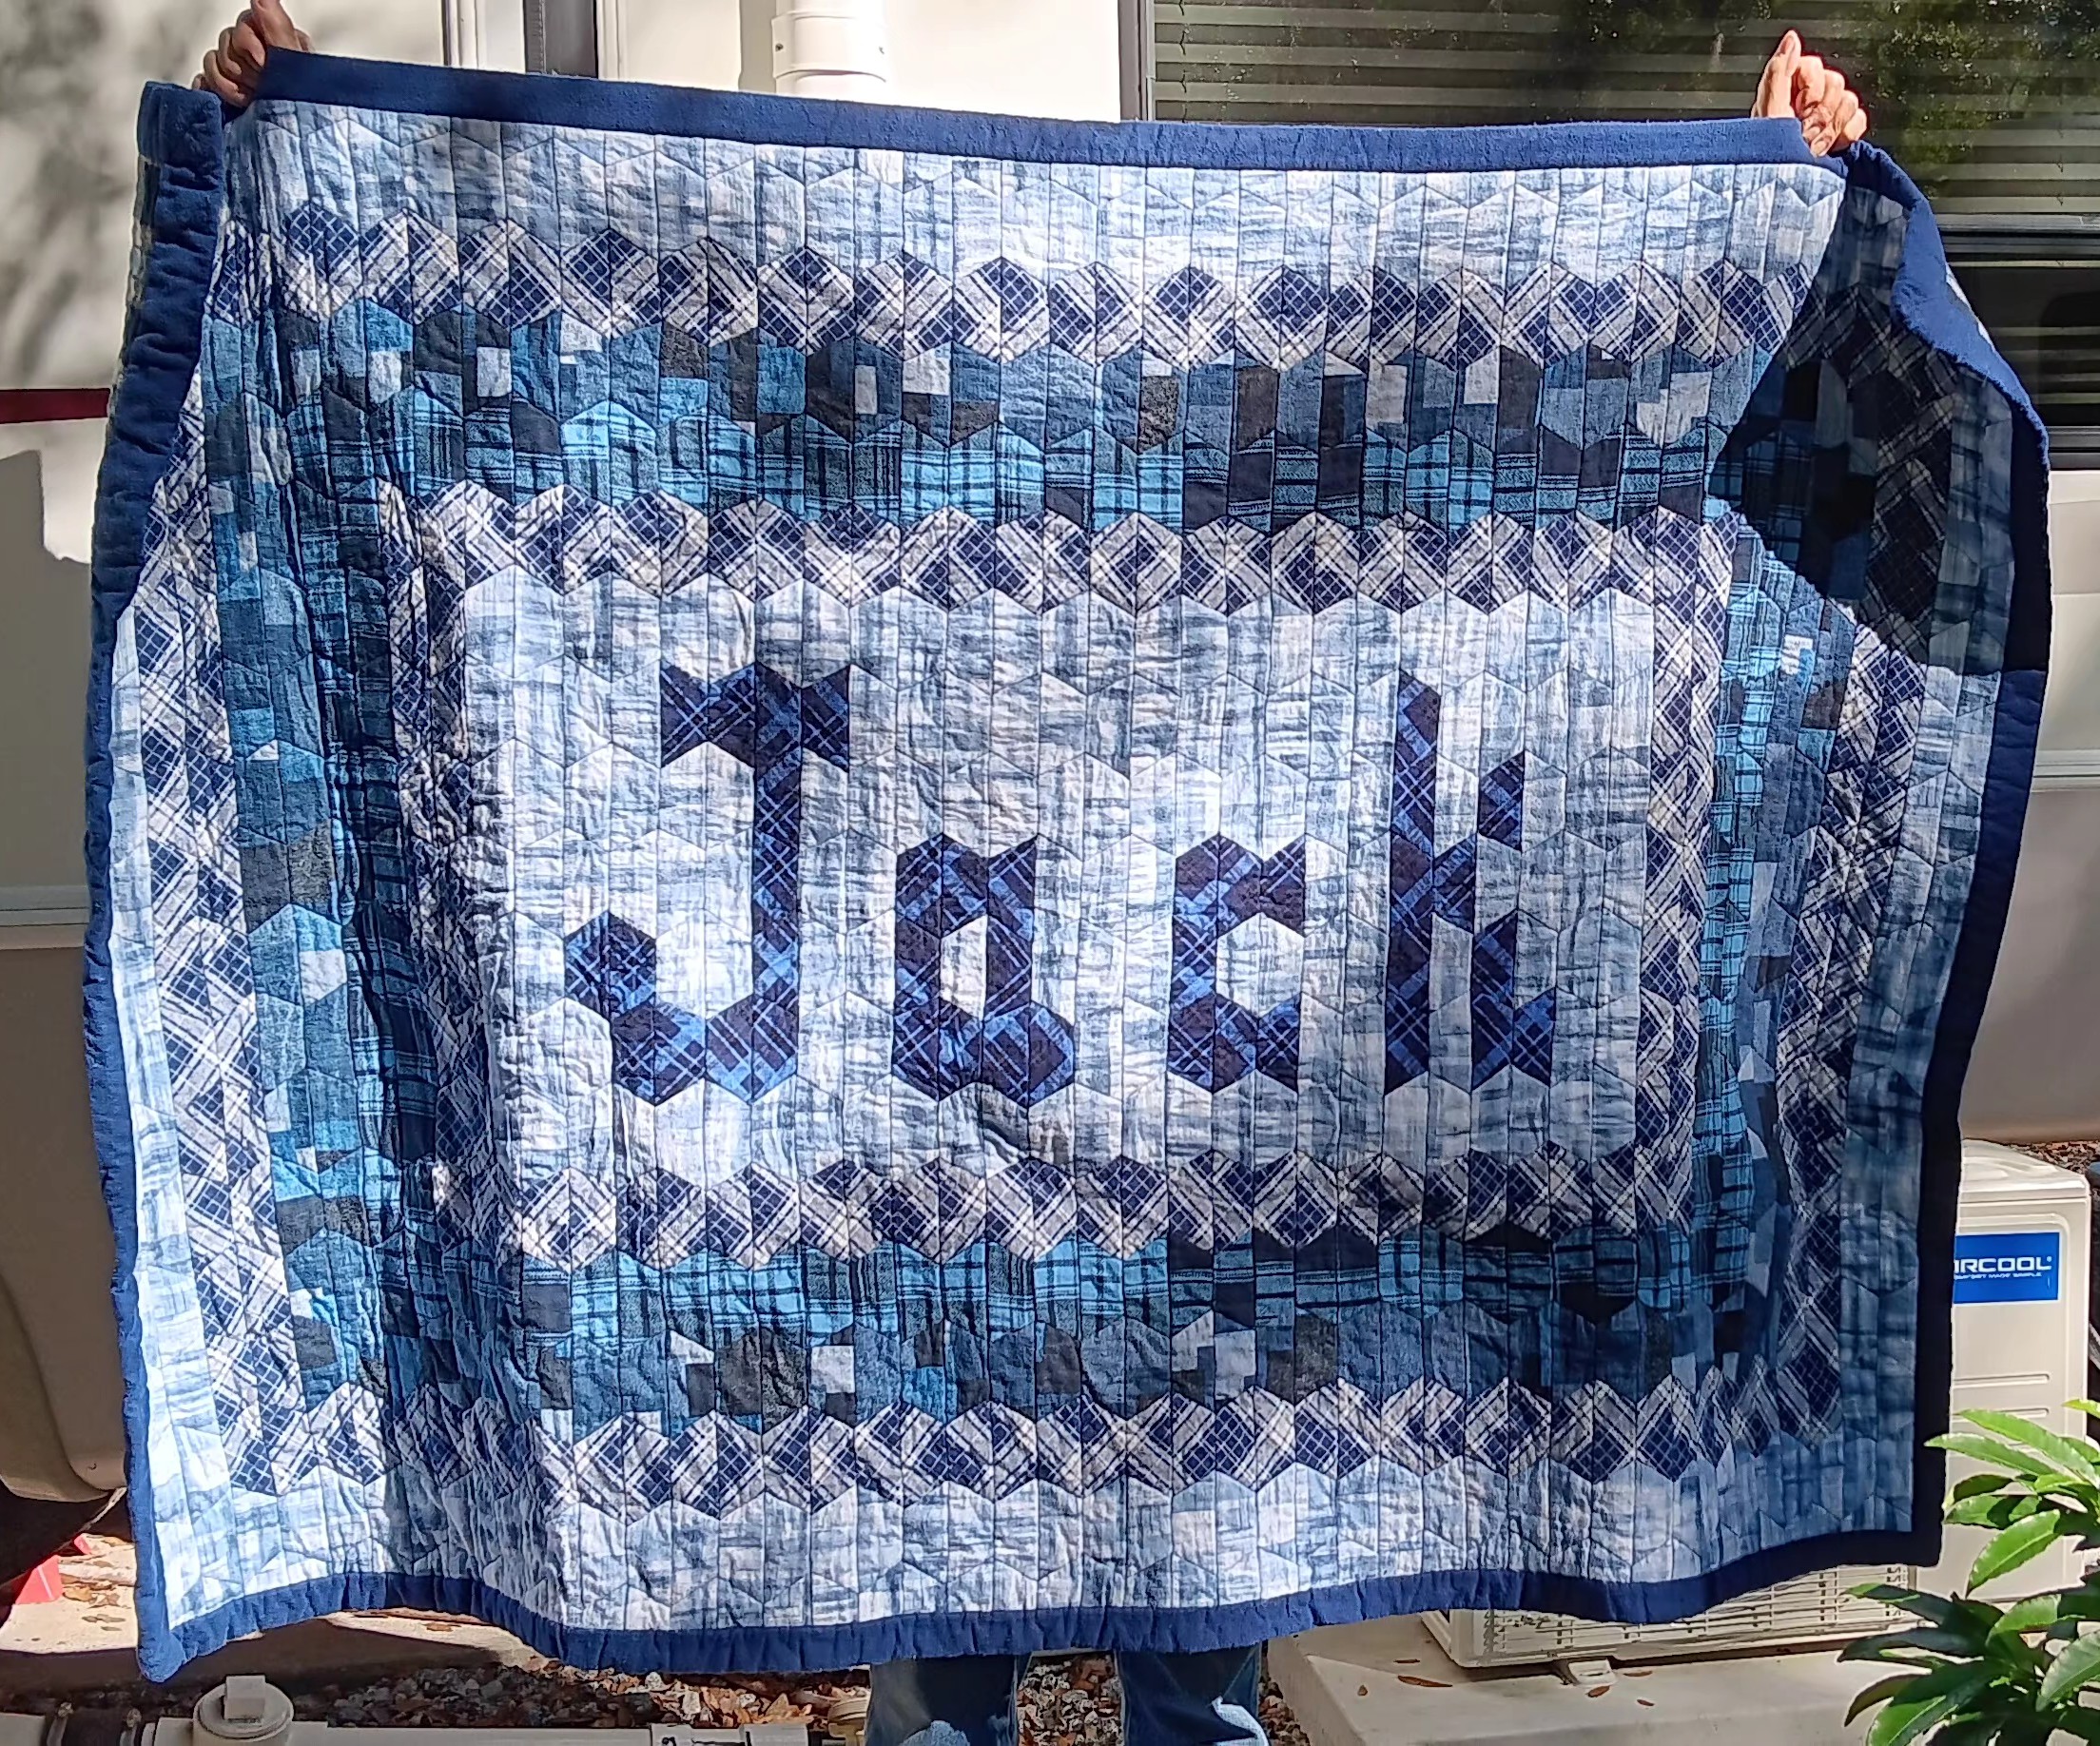
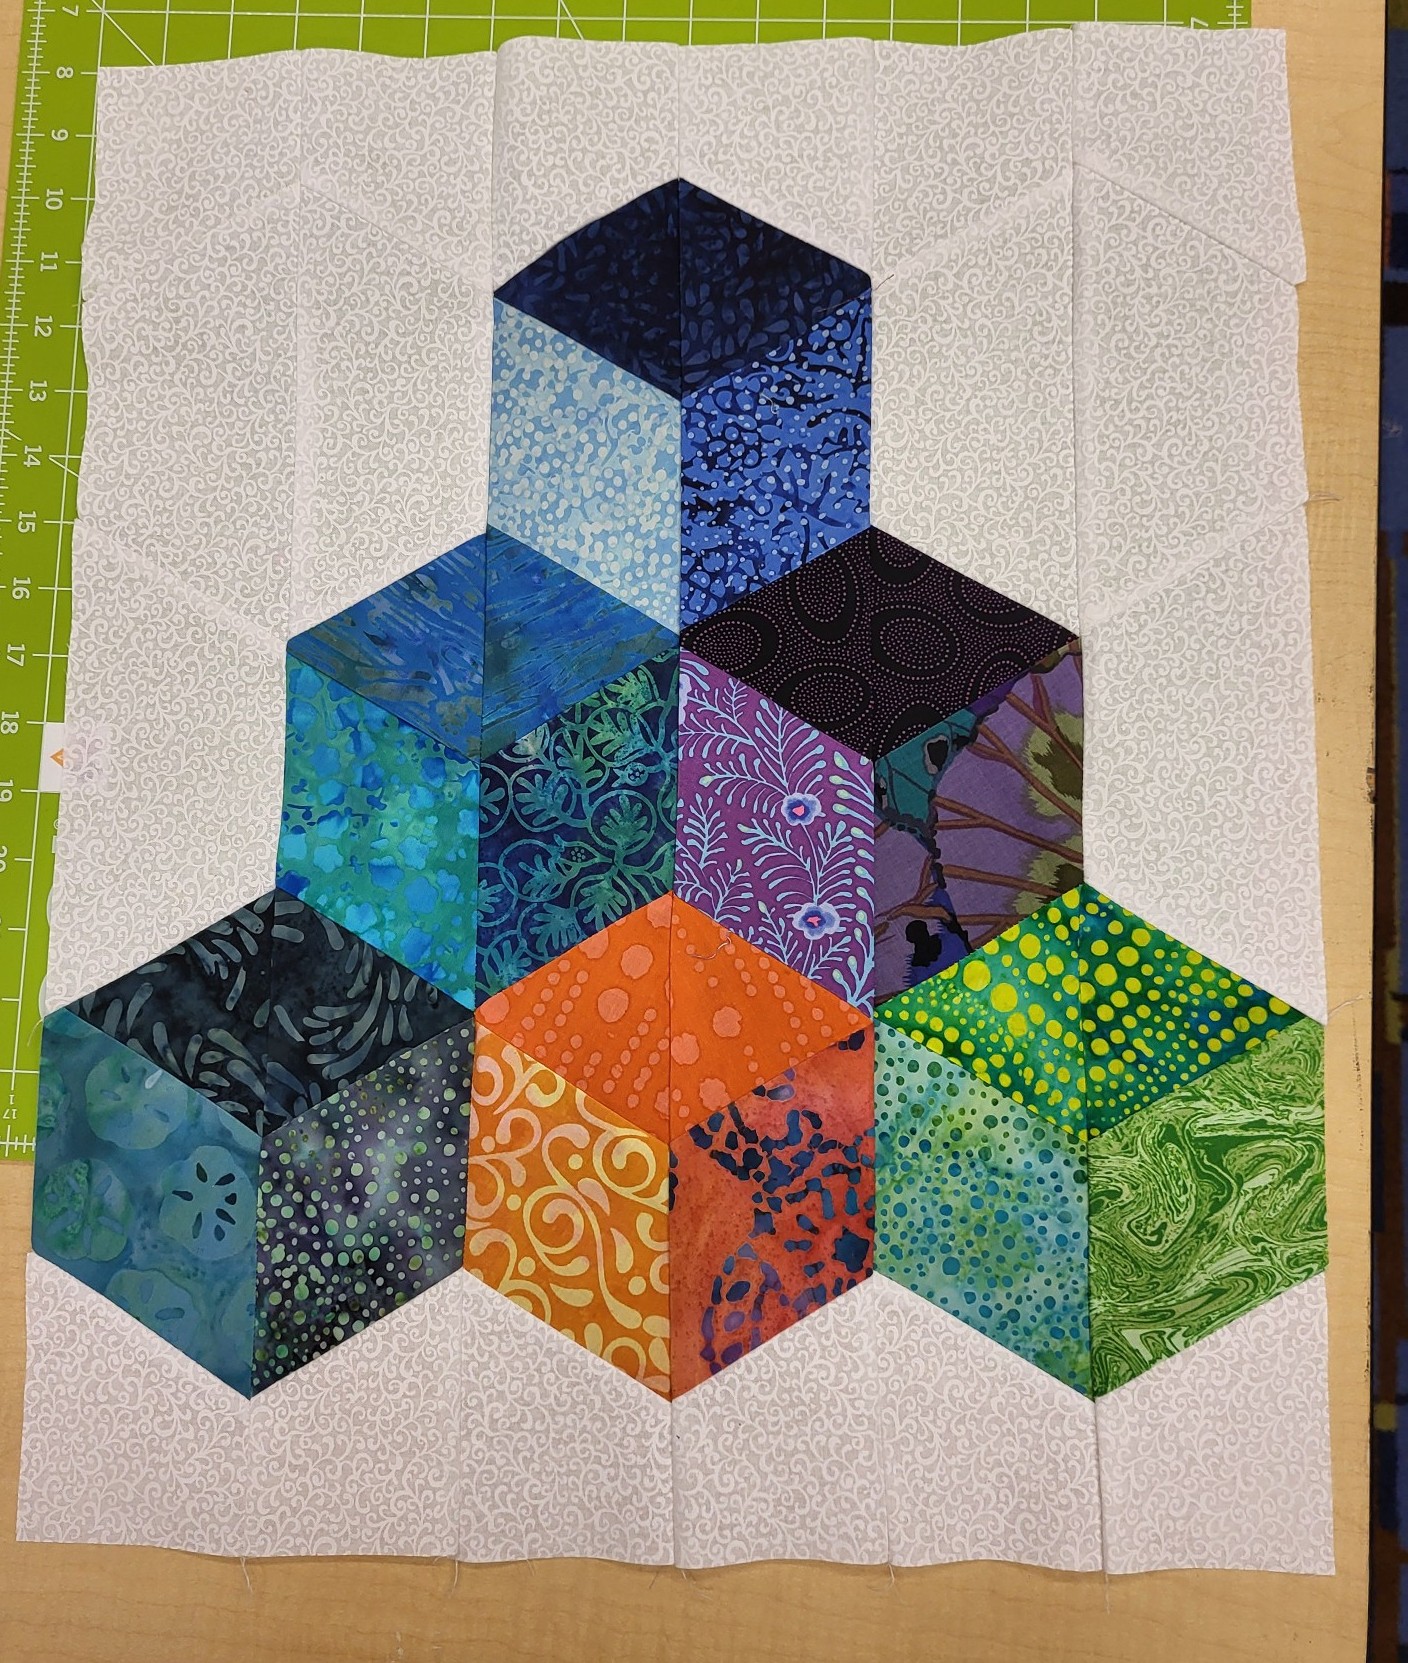
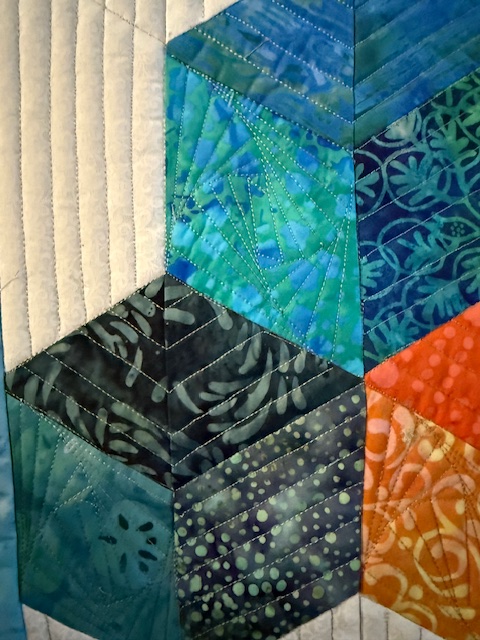
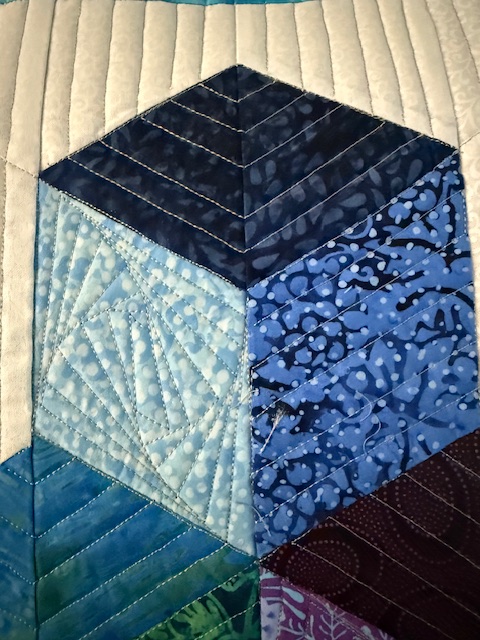
I love when quilt friends show up with photos of quilts they have made with my products. Look at this beauty made my Debbi C. The quilt was made for her grandson out of flannel leftovers from shirts and lounge pants she made for him. A true TREASURE!! Oh and by the way, this was her first quilt! How AWESOME is that. Great job Debbi!!!! The letters are from my book Hexie Speak – Say it with Hexies using Hex-a-Mini template.
And look at this wonderful Twirl-a-Tool quilt made by Maritza J. I love her use of colors on the gray with black dots background. She made Twirl about 6 years ago. She even added a scrappy binding. Nicely done!
In my classes at the show, we learned Bindings (Become a Brilliant Binder), Simple Shapes (Simple Piecing is the Cornerstone) and Strip pieced Tumbling/Baby Blocks (Oooh Hexie Baby). I have photos from Oooh Hexie Baby! Many students had their blocks packed up when I remembered to start taking photos. I was so pleased with how far they all got with making blocks. I’m looking forward to seeing more photos. (A hint to my students…send photos!!! Please!)
This first piece looks amazing in solids with the wonderful gray background! Great work!
The next blocks had a variation of where she placed her light, medium and dark value. She wanted the flowers on a face of each block. I enjoyed the 3-D effect and sweet coloring!
The next student, Kimberly S., was determined to get these sewn together in class. She sent the photos of her finish piece just a few days after class! Nicely DONE!!
Time always flies when teaching. I was so proud of all that was accomplished! When taking a class there were a few things that helped….First – bring the rotary cutter you are comfortable using. Second – always bring the basic supplies you sew with (pins, seam ripper, patience) and Third – we love our machine educators in the classroom. It is always a comfort to have immediate help when sewing on a new machine. Plus, the great deals the machine dealers offer at a show!
#1 – Thank the show sponsors! they spend a lot of time and money to put sewing machines in classrooms at quilt shows.
#2 – Take a chance and take a class. It is fun to learn new techniques!
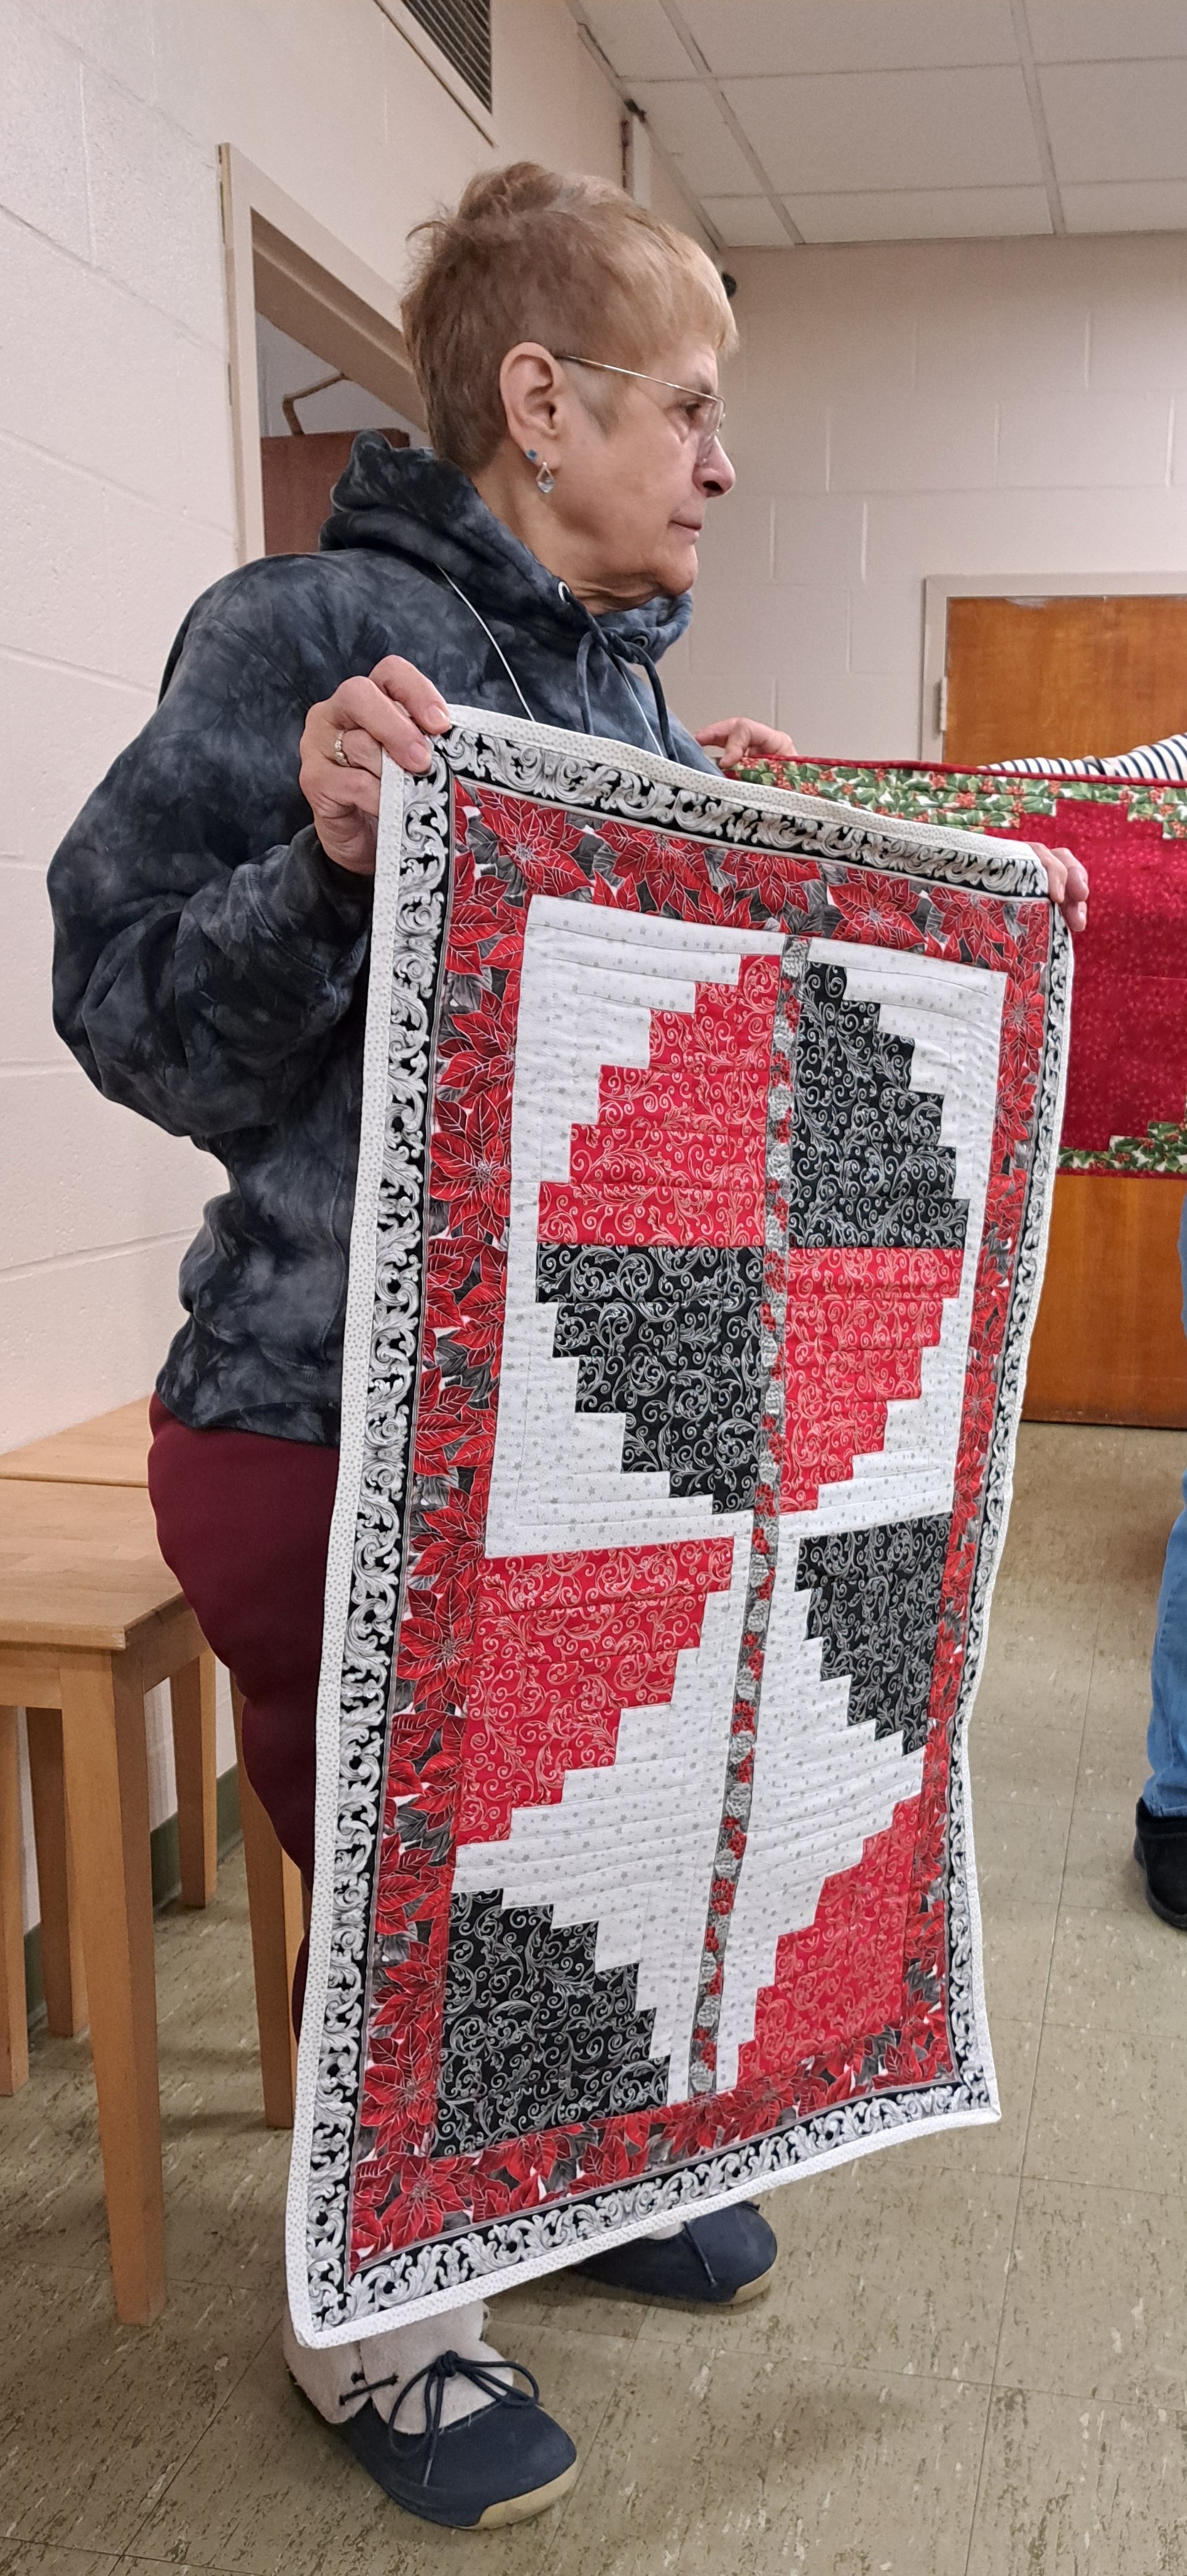
Finishes worth sharing! I have three more shares of the Curved Log Cabin Workshop I taught in December for the Blackstone Valley Heritage Quilters.
Kathy B. used the kit I made with the fabrics of my sample. I love how she incorporated the scraps as sashing. Even though they are Christmas fabrics, it has a budding flower feel! Well done!
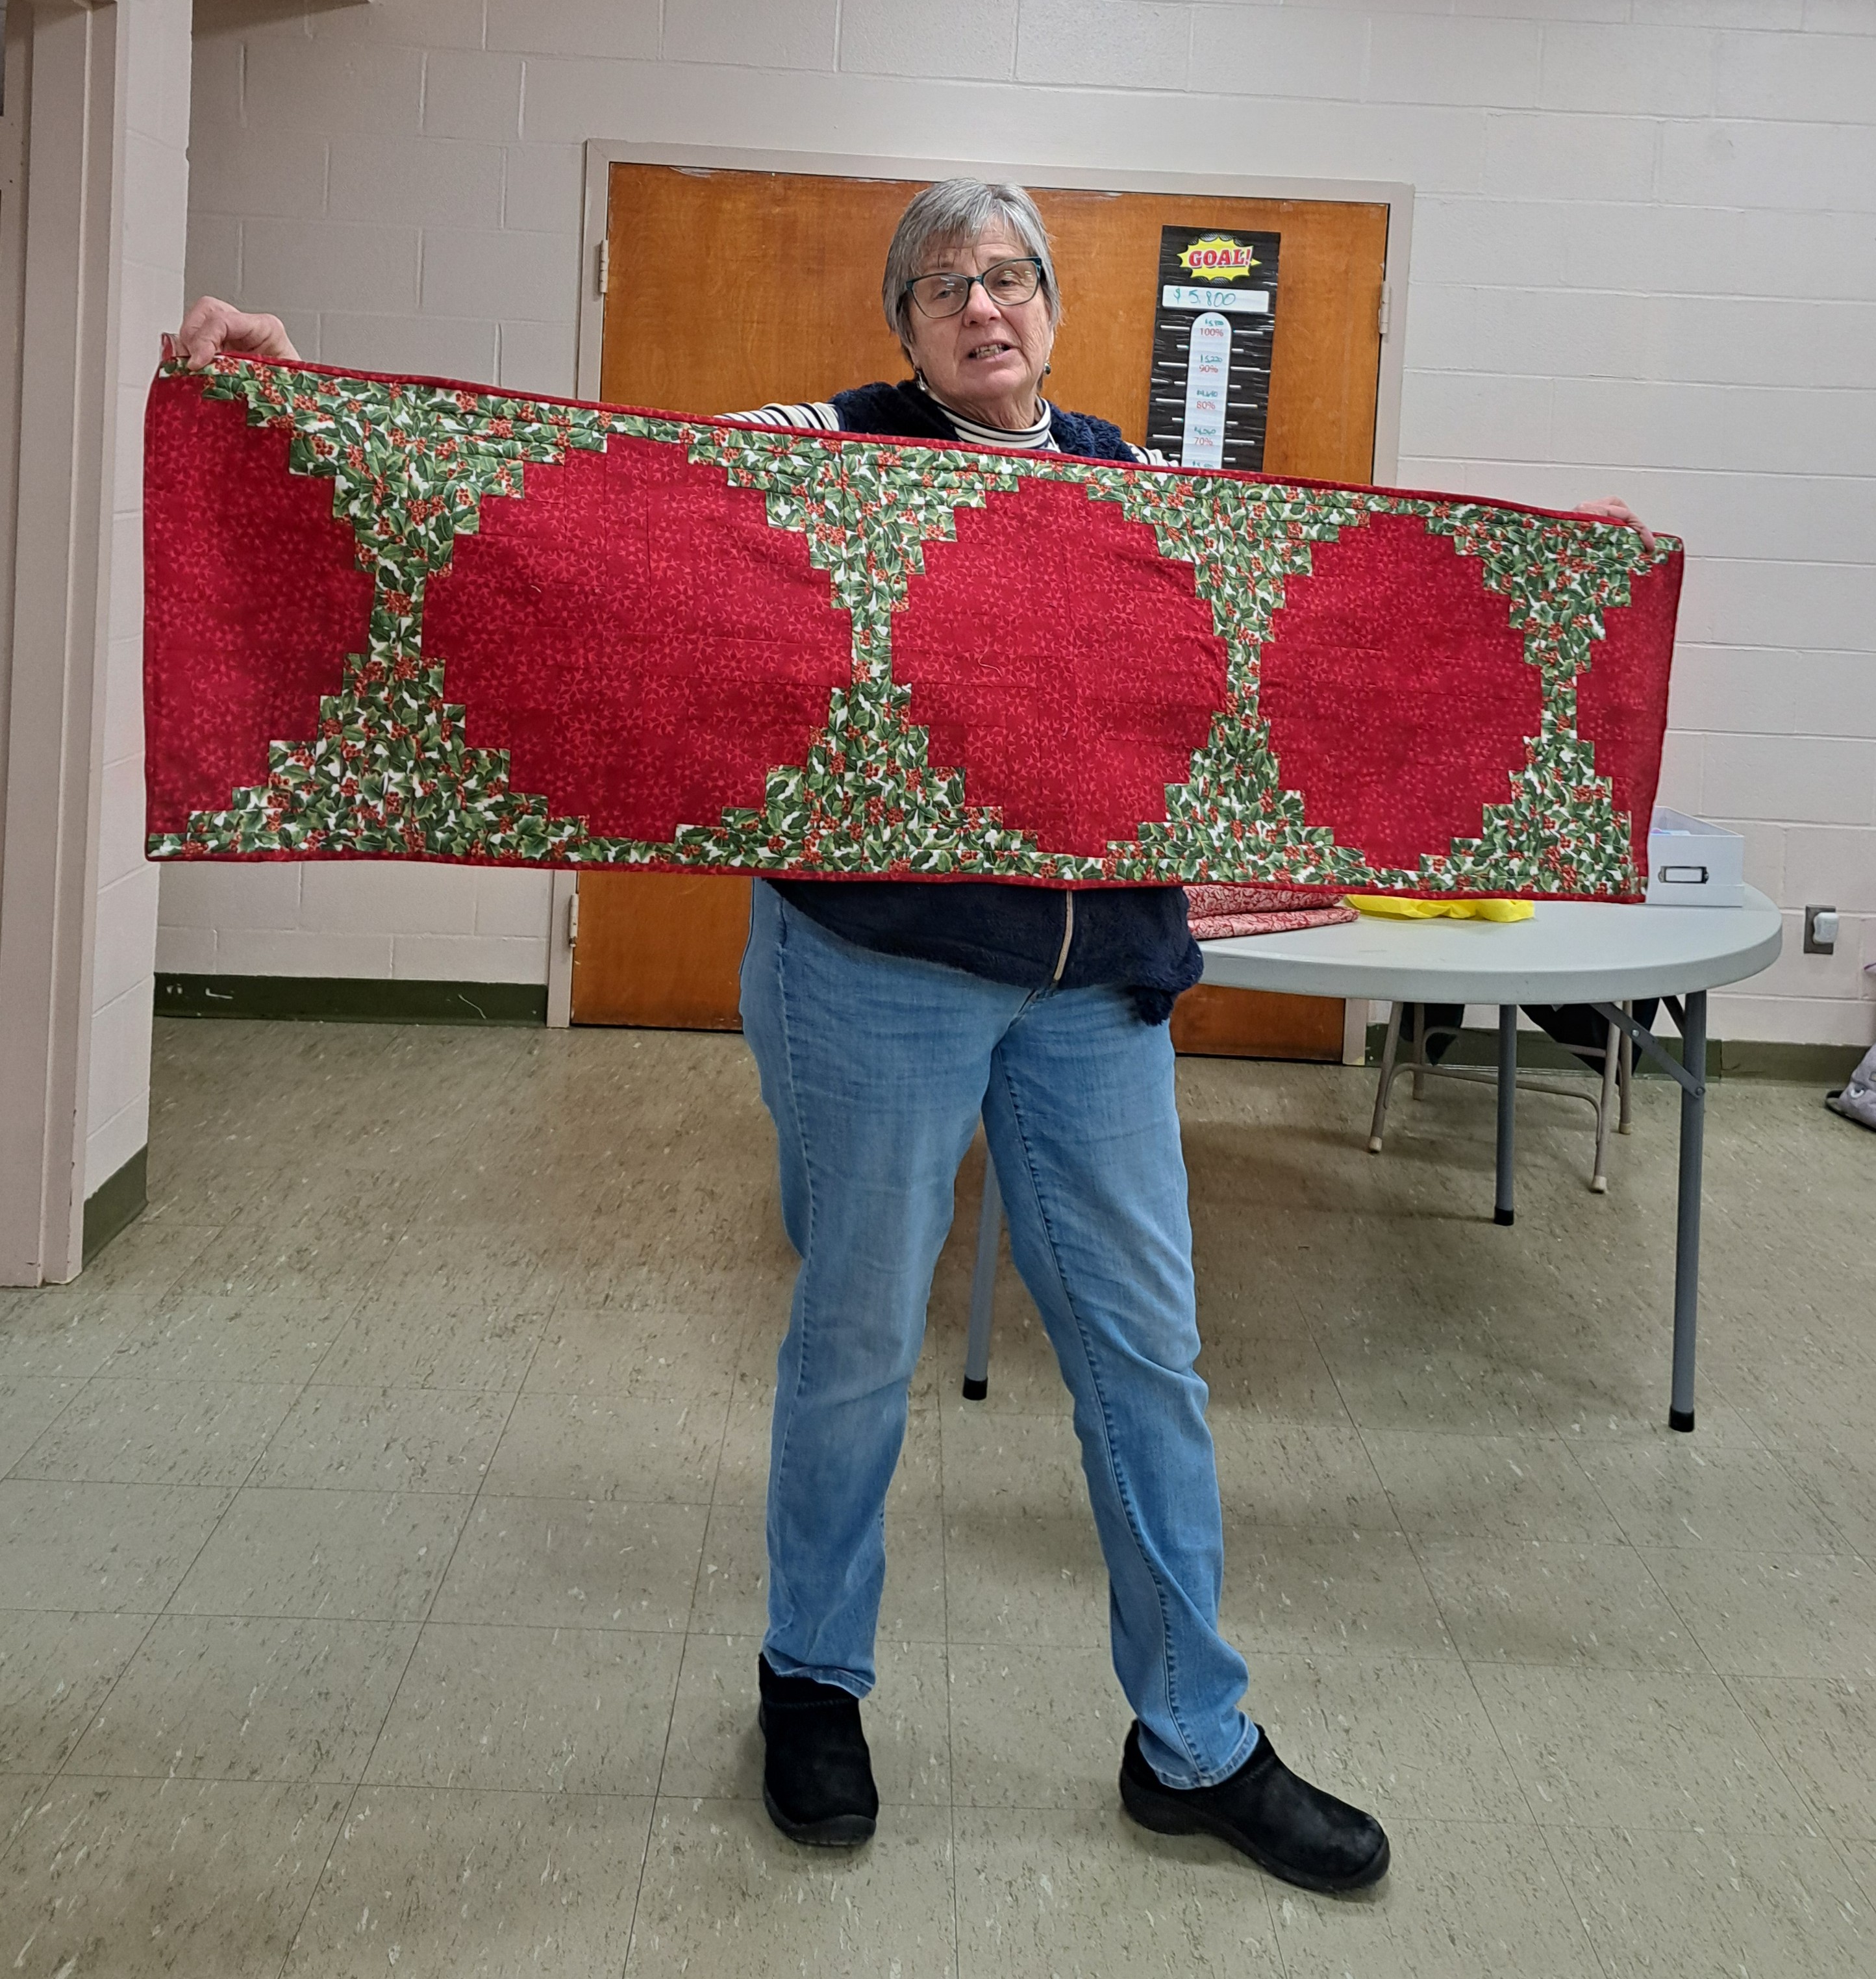
Karen M. used a beautiful holly fabric for the background with the focus on the excellent red stary fabric. It will look amazing on a holiday table. I can envision a beautiful centerpiece in her center circle. Yes, that is a binding you see. Great finish!
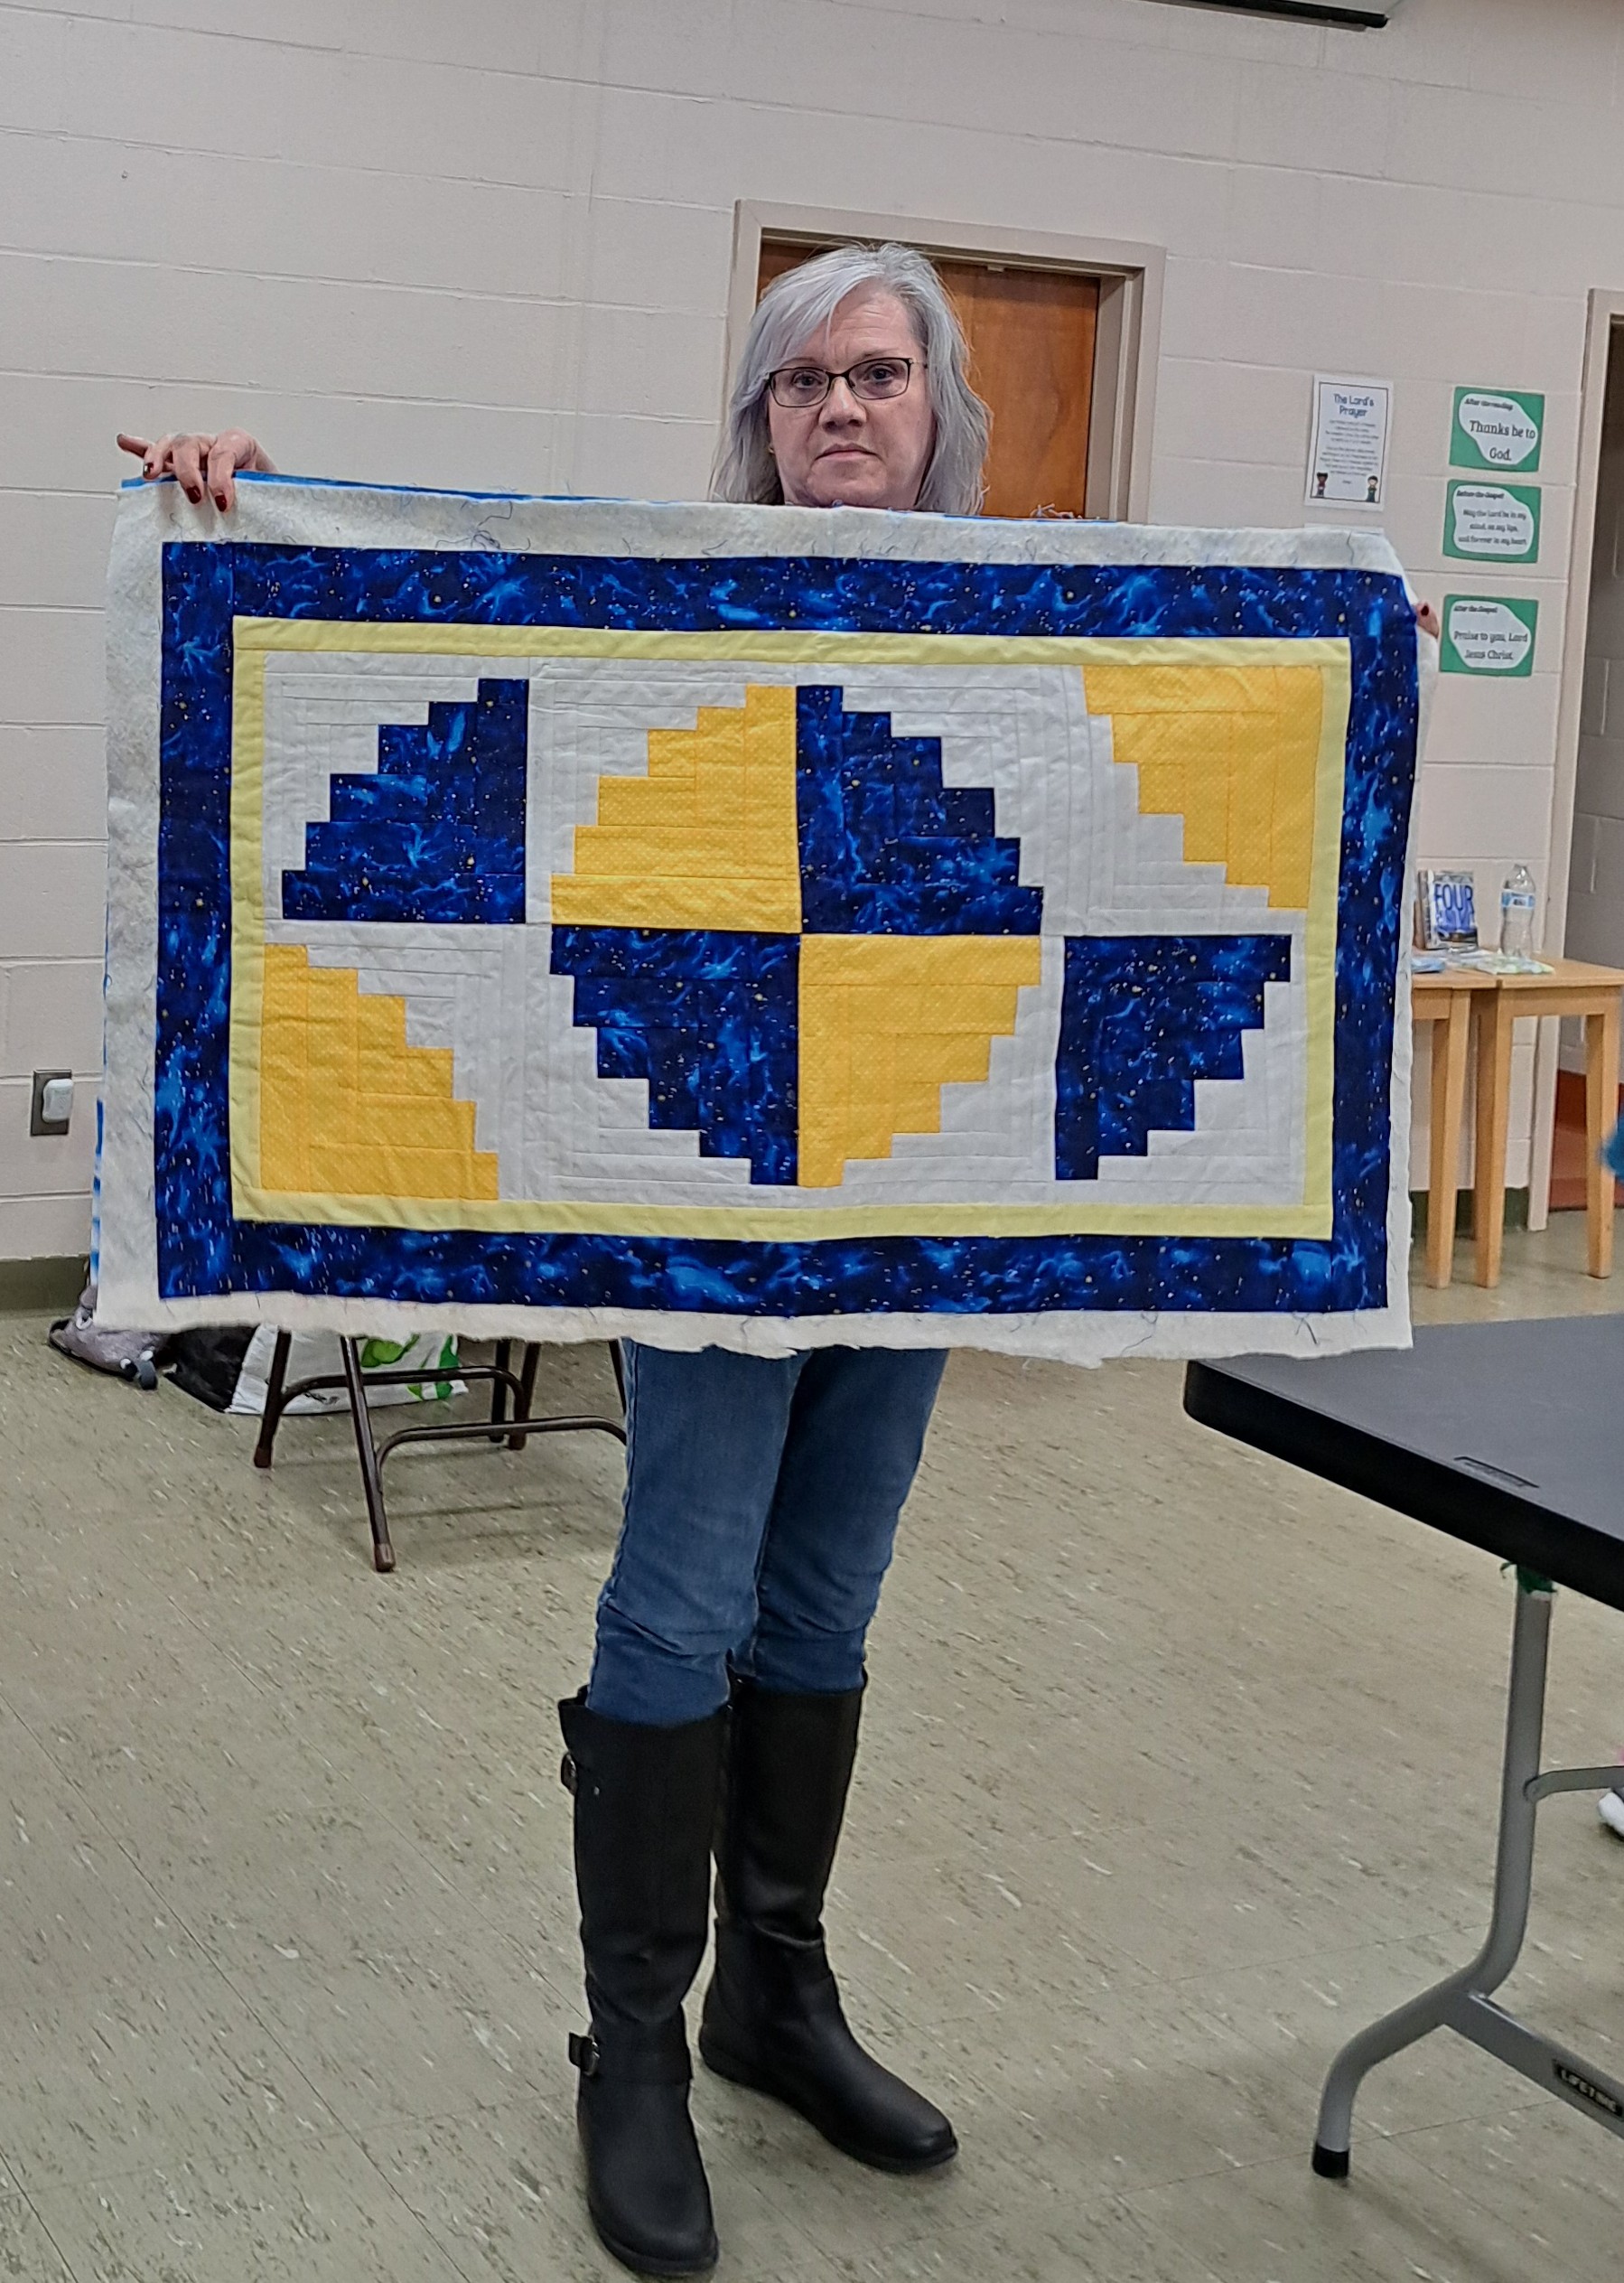
Lori L. has her beautiful blue and yellow table runner ready to quilt. I love how her blue fabric sparkles. The layout reminds me of a wrapped piece of chocolate! Another one nearing completion. Great job!
Thank you ladies for sharing your finishes!
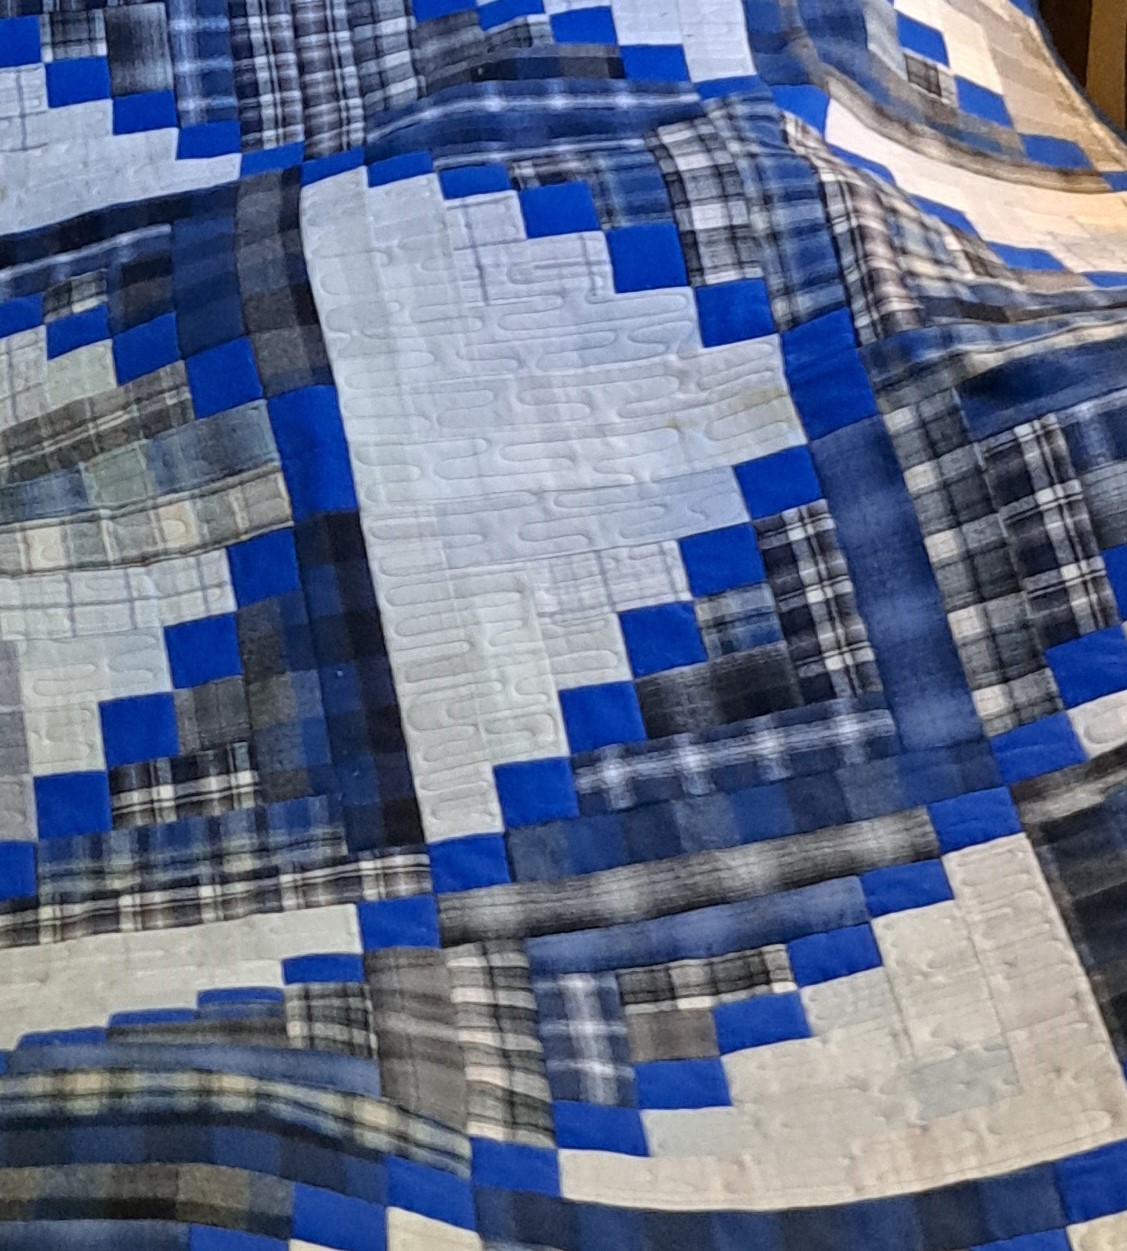
What have you finished lately? With all the uncertain weather, have you been inside sewing? Or out and about? I find it good weather to sew on bindings. Keep the quilt in your lap for a warmth on these cold evenings. I love to piece in the winter and gaze out at the falling snow. I know snow is a four letter word for some…..S N O W…. yes, four letters! But I love snow! I believe you have heard me say this before. I love flannel quilts in the winter. I shared my finish of the king size log cabin I made for a nephew. I’m not sure if you have seen my 4-3-2-1-DONE quilt. It is bright flannels! This was one of the first patterns. You can find it on my website, HERE.
Not much time for sewing or finishes, I’ve been busy prepping for my first show of the year. More on that next week! A few tips, though, for working with flannels. #1 – Always pre-wash and dry. Flannel tends to be a looser weave fabric and washing tightens the weave. #2 – Spray starch the flannels before cutting. Because of the looser weave, the starch/Best Press/Magic Sizing really helps control the fabric.
I hope you’ll find some yummy flannels to make a winter quilt. Keep it simple, let the flannel fabrics do the talking and have a finish to share!
in quilting,
Debbie
P.S. The “Fall in Love with Quilting Club” is now LIVE!!! If you haven’t already, there is still time to use my coupon code to get the club FREE this year! There were technical problems yesterday, but all should be back working correctly. Use my coupon code DEBBIE-GAVE-IT-FREE when you enroll to get the Club FREE. Choose the $29 intro price and move on to the sign up. There will be a space to enter the coupon code to knock the price to FREE!! You are welcome to share my coupon with your quilty friends or friends who want to learn to quilt!
I attended my guild’s (Thimble Pleasures) Getaway last weekend. It was three and a half days of sewing fun!! We go to a hotel on “the Cape” (N. Falmouth, Cape Cod, MA) It has a huge ballroom of which we each get an 8 foot table to spread out! I have been there before with two different guilds. I love the view from the restaurant, makes for an even better attitude.
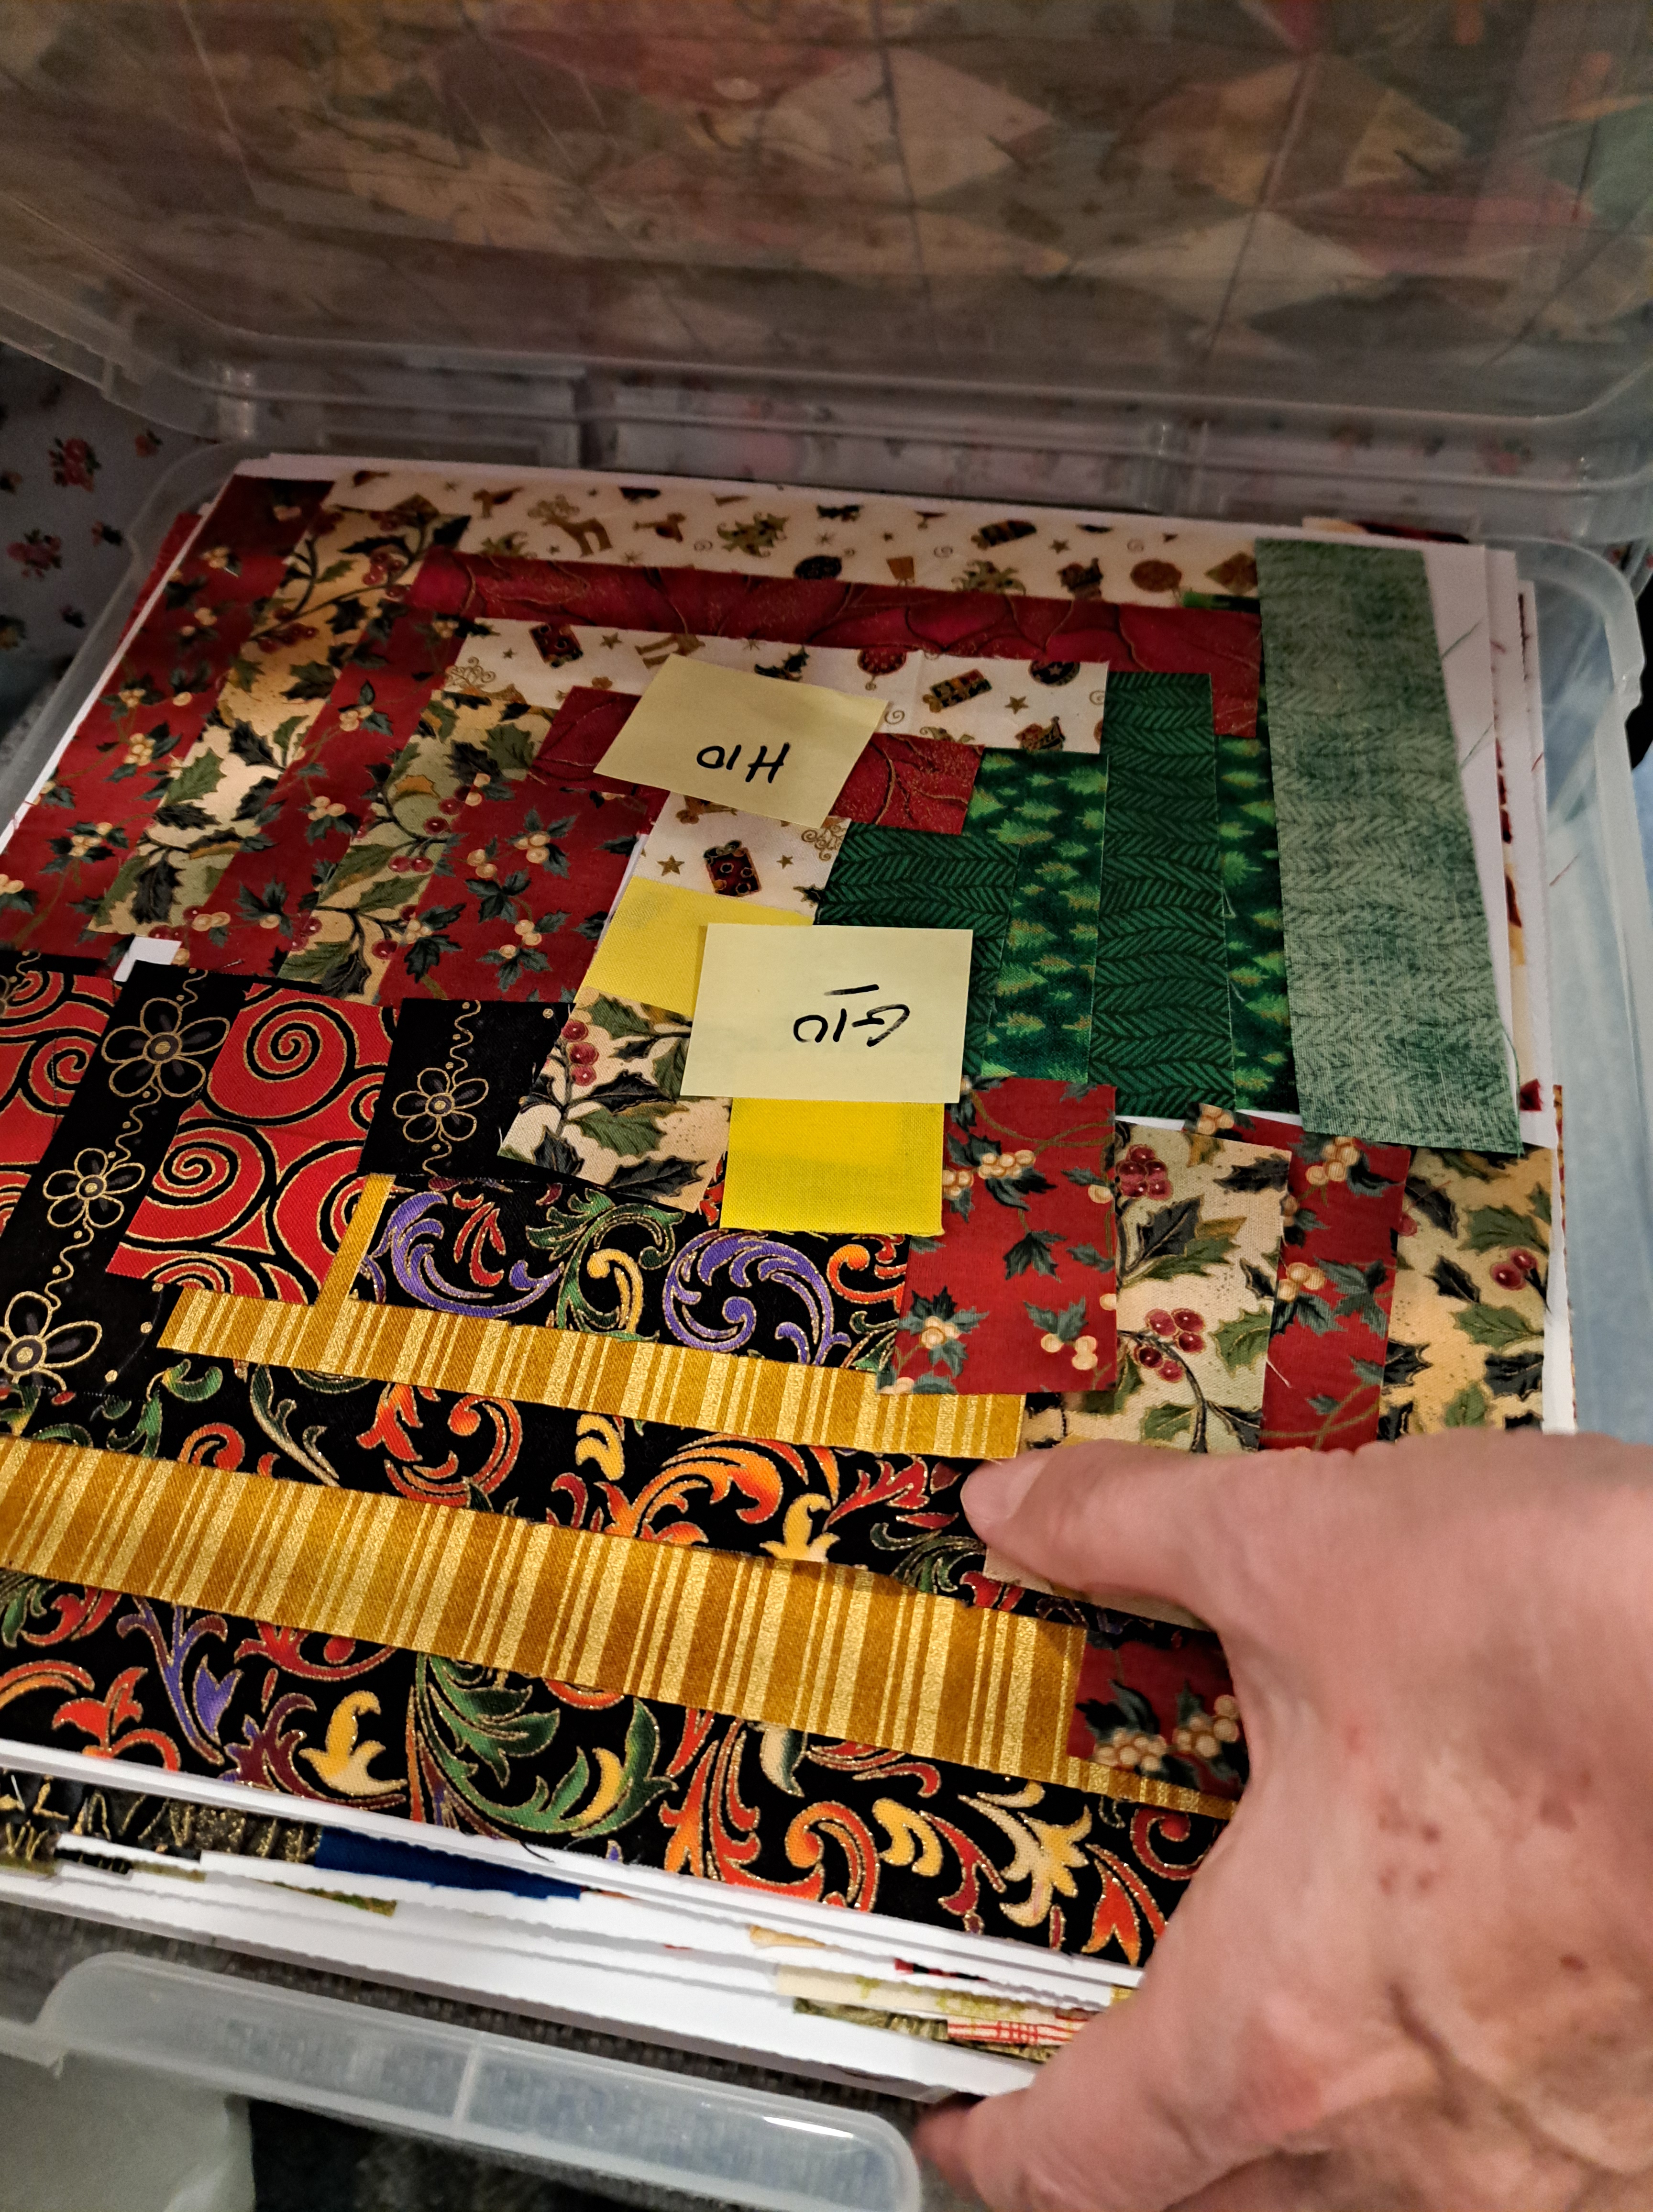
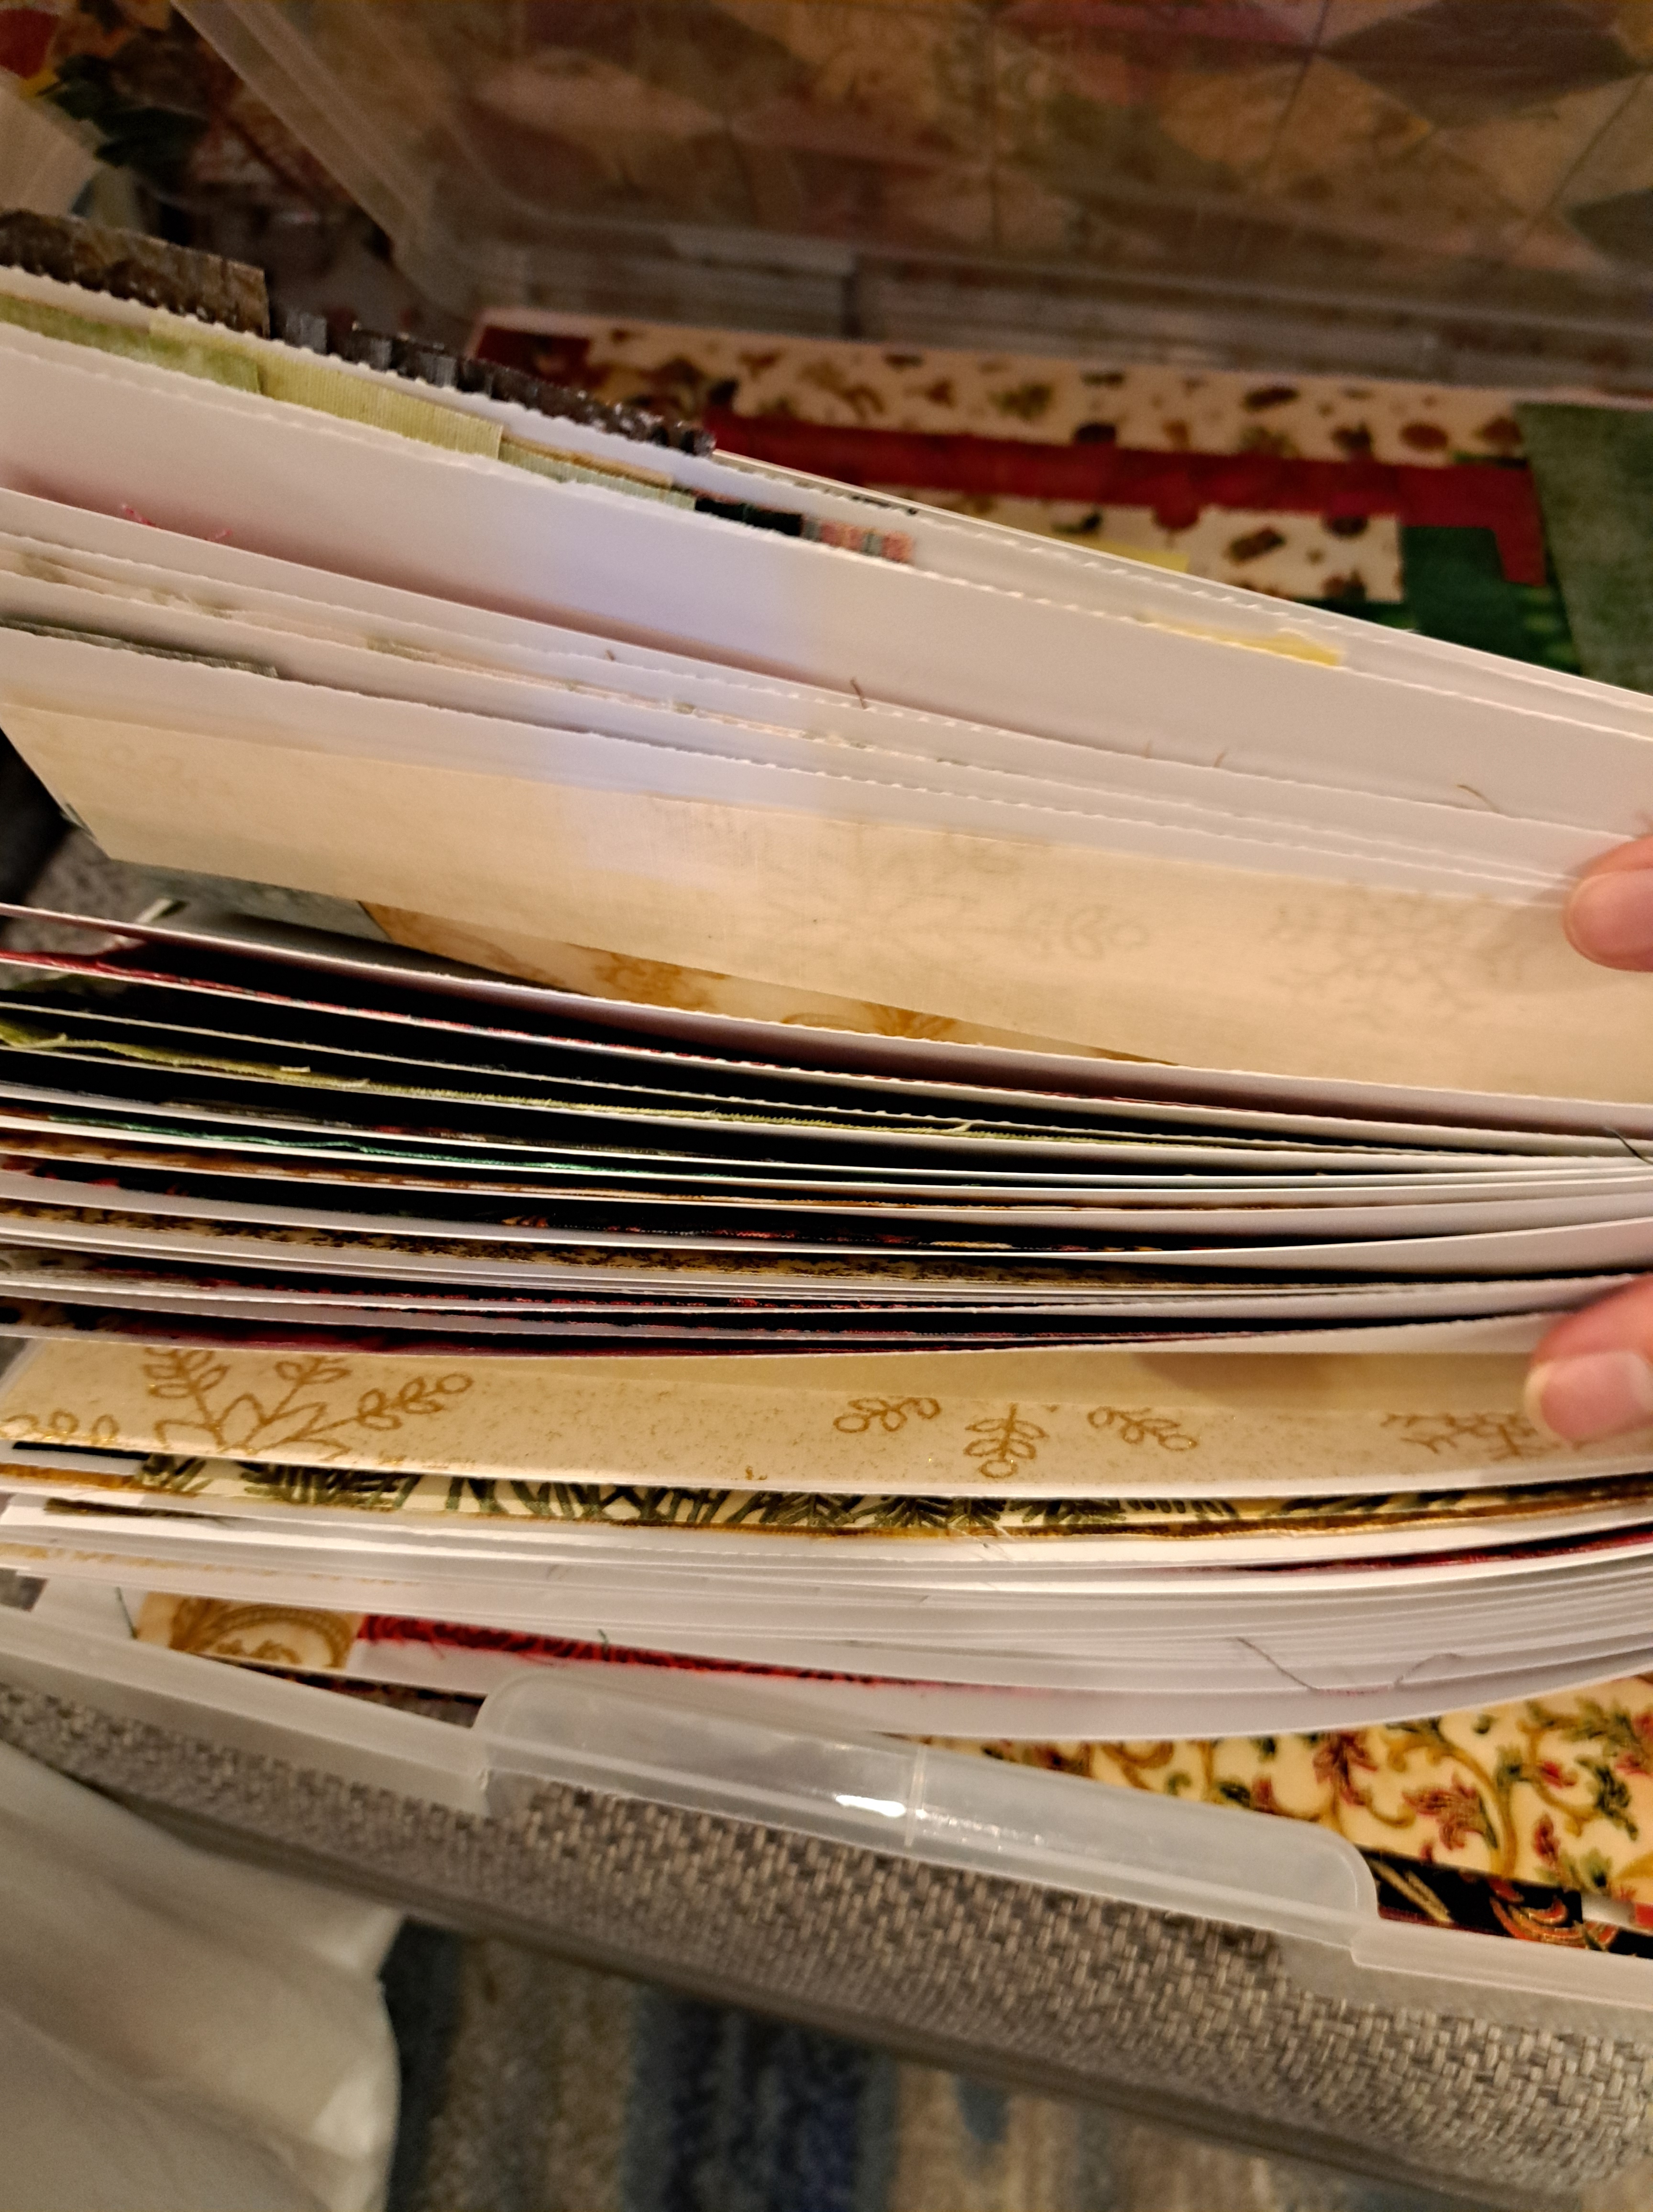
Many do prep AHEAD of going. More time for sewing! My friend Shari is a master planner and super preparer of blocks. Just look at her small centers and larger pieces. They are all LABELED!!! Plus she organized each block in layers, upon layers, of blocks! It sure made her piecing easier! All of the blocks were in a 12″square plastic box.
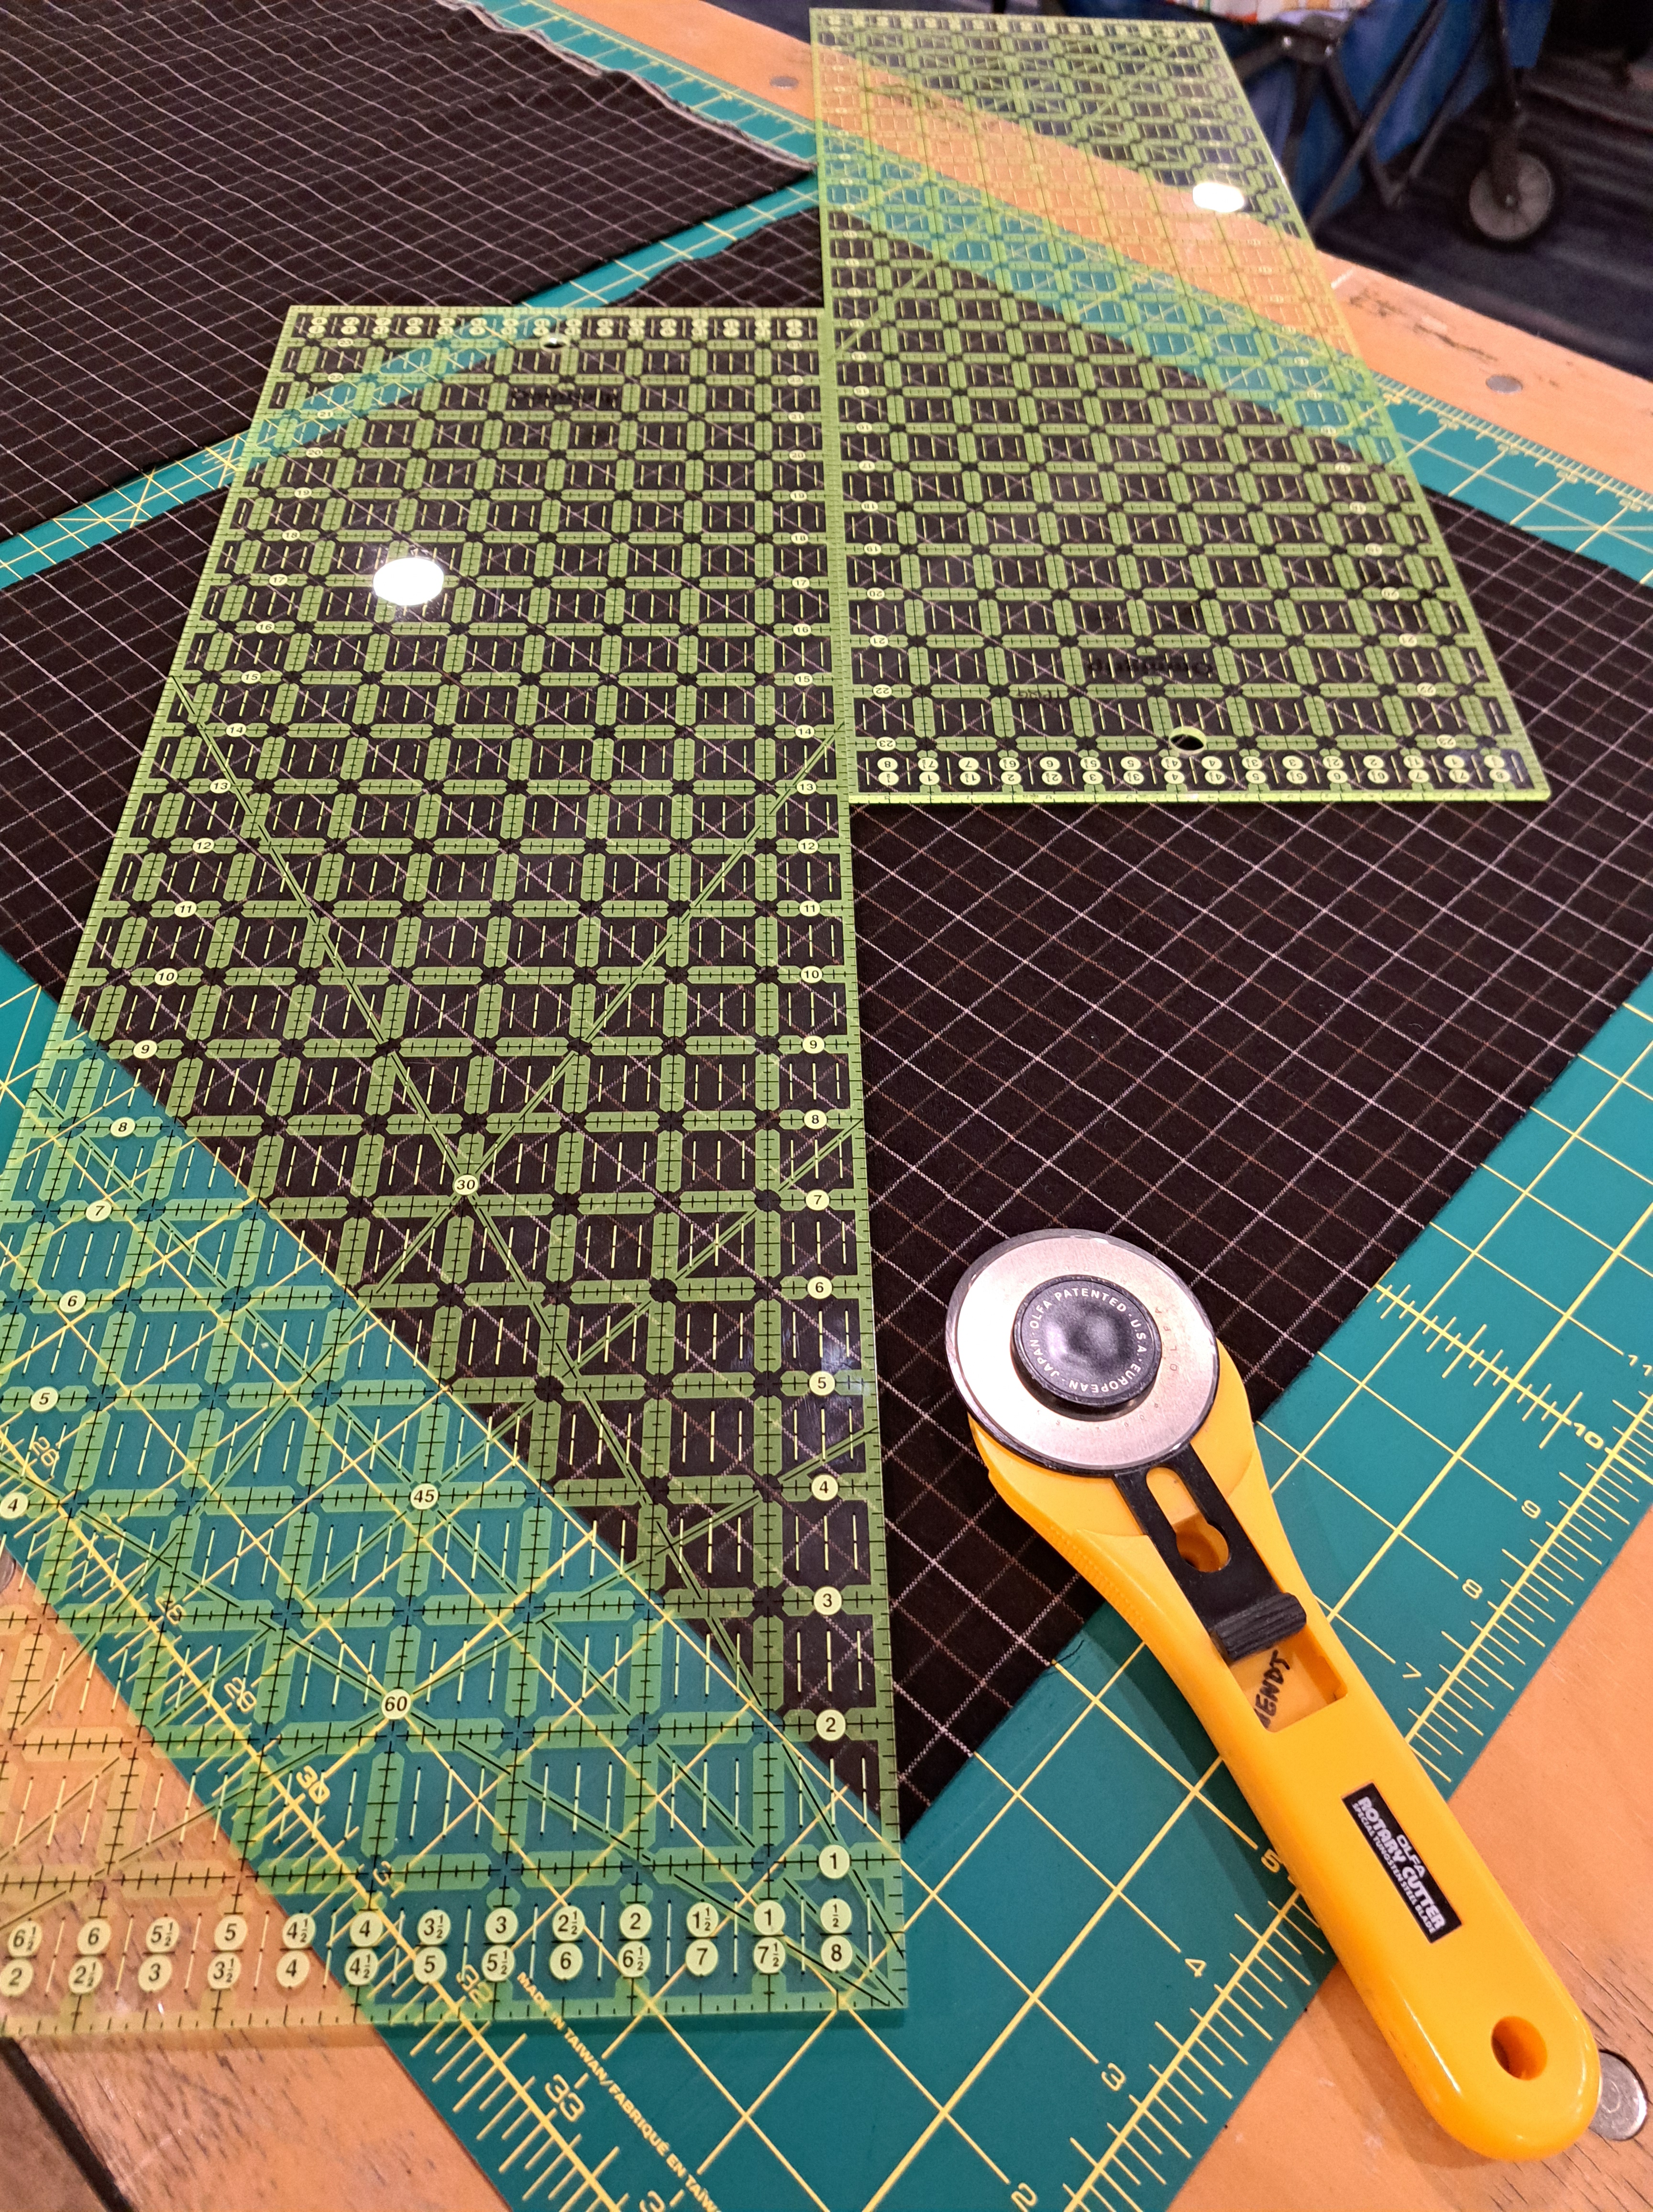
I usually do as much prep as I can at home, but this time I waited and cut at the Getaway. I knew we would have cutting tables set up for us to use. It is easier to use a large mat there, instead of at home. I needed to cut large 19″ squares to cut into side triangles. To do this I cut the square diagonally twice (from corner to corner, both directions). I do not have a ruler that will span the entire length of the diagonal. So I use 2 rulers to accomplish the cut. (Nice that our guild has rulers we can use!)
The following photos shows how laying 2 rulers side by side can make the span of the diagonal. I am right handed, so I start the cut on the right side of the bottom left ruler. Then, I slide the left ruler along the right until it crossed the opposite corner. Keeping that ruler firmly in place, I can then finish the cut along the right edge of the left ruler. (Remove the right ruler before cutting.) I’ve promised videos of my tips….I’ll work on showing this in a video in the next month. Since I’m heading to Daytona Beach in another week and a half for the AQS Quilt Week. I’ll “shoot” for March to shoot the videos!
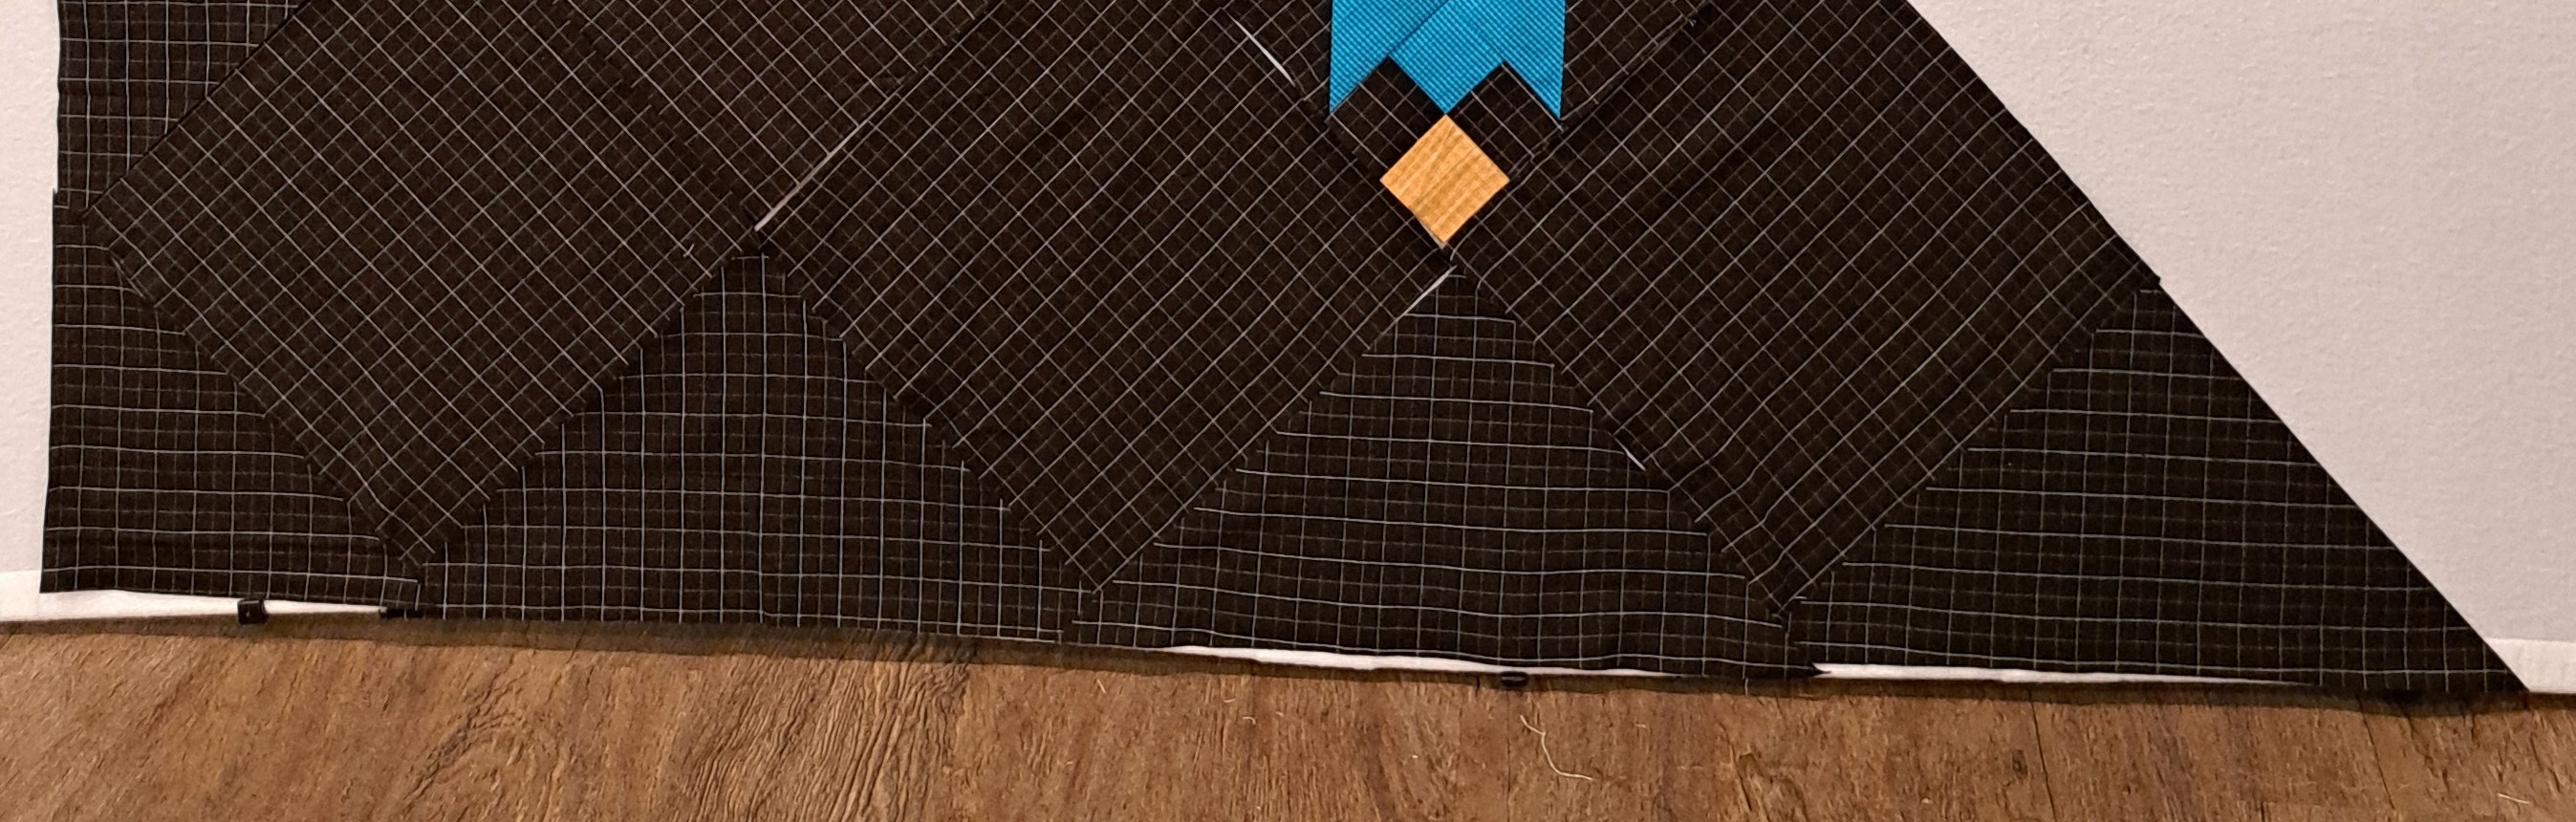
This is where the side triangles go in this quilt. The complete the outer edges when putting blocks on point. I’m filling in the bottom of this quilt in the photo below. The bottom left corner is a half square.
Speaking of videos… Have you seen the new “Fall in LOVE with Quilting Club”? It is a new “club” that will start next week. I am one of 14+ designers that will be presenting videos, tip sheets and free patterns or snip-its of blocks to make patterns! I will add the links below but the best part of the Club, it is FREE if you use my coupon code. DEBBIE-GAVE-IT-FREE. I would love for you to join the club using my coupon! My info will be given later in the summer, but there will be several designer’s information given EVERY month for an entire YEAR!! Go here to sign up… Fall in Love with Quilting Club…It is not housed on Facebook, but there is information about it there.
#1 – Pre-cut and organize! Shari used cardstock to layer each block in her quilt and did loads of labeling to keep things organized!
#2 – Use 2 rulers to cut large side triangles. This helps to span the length of the cut!
Bonus- Sign up for “Fall in Love with Quilting” using my coupon code. DEBBIE-GAVE-IT-FREE It is totally free with the code. You work through the months at your OWN pace!!
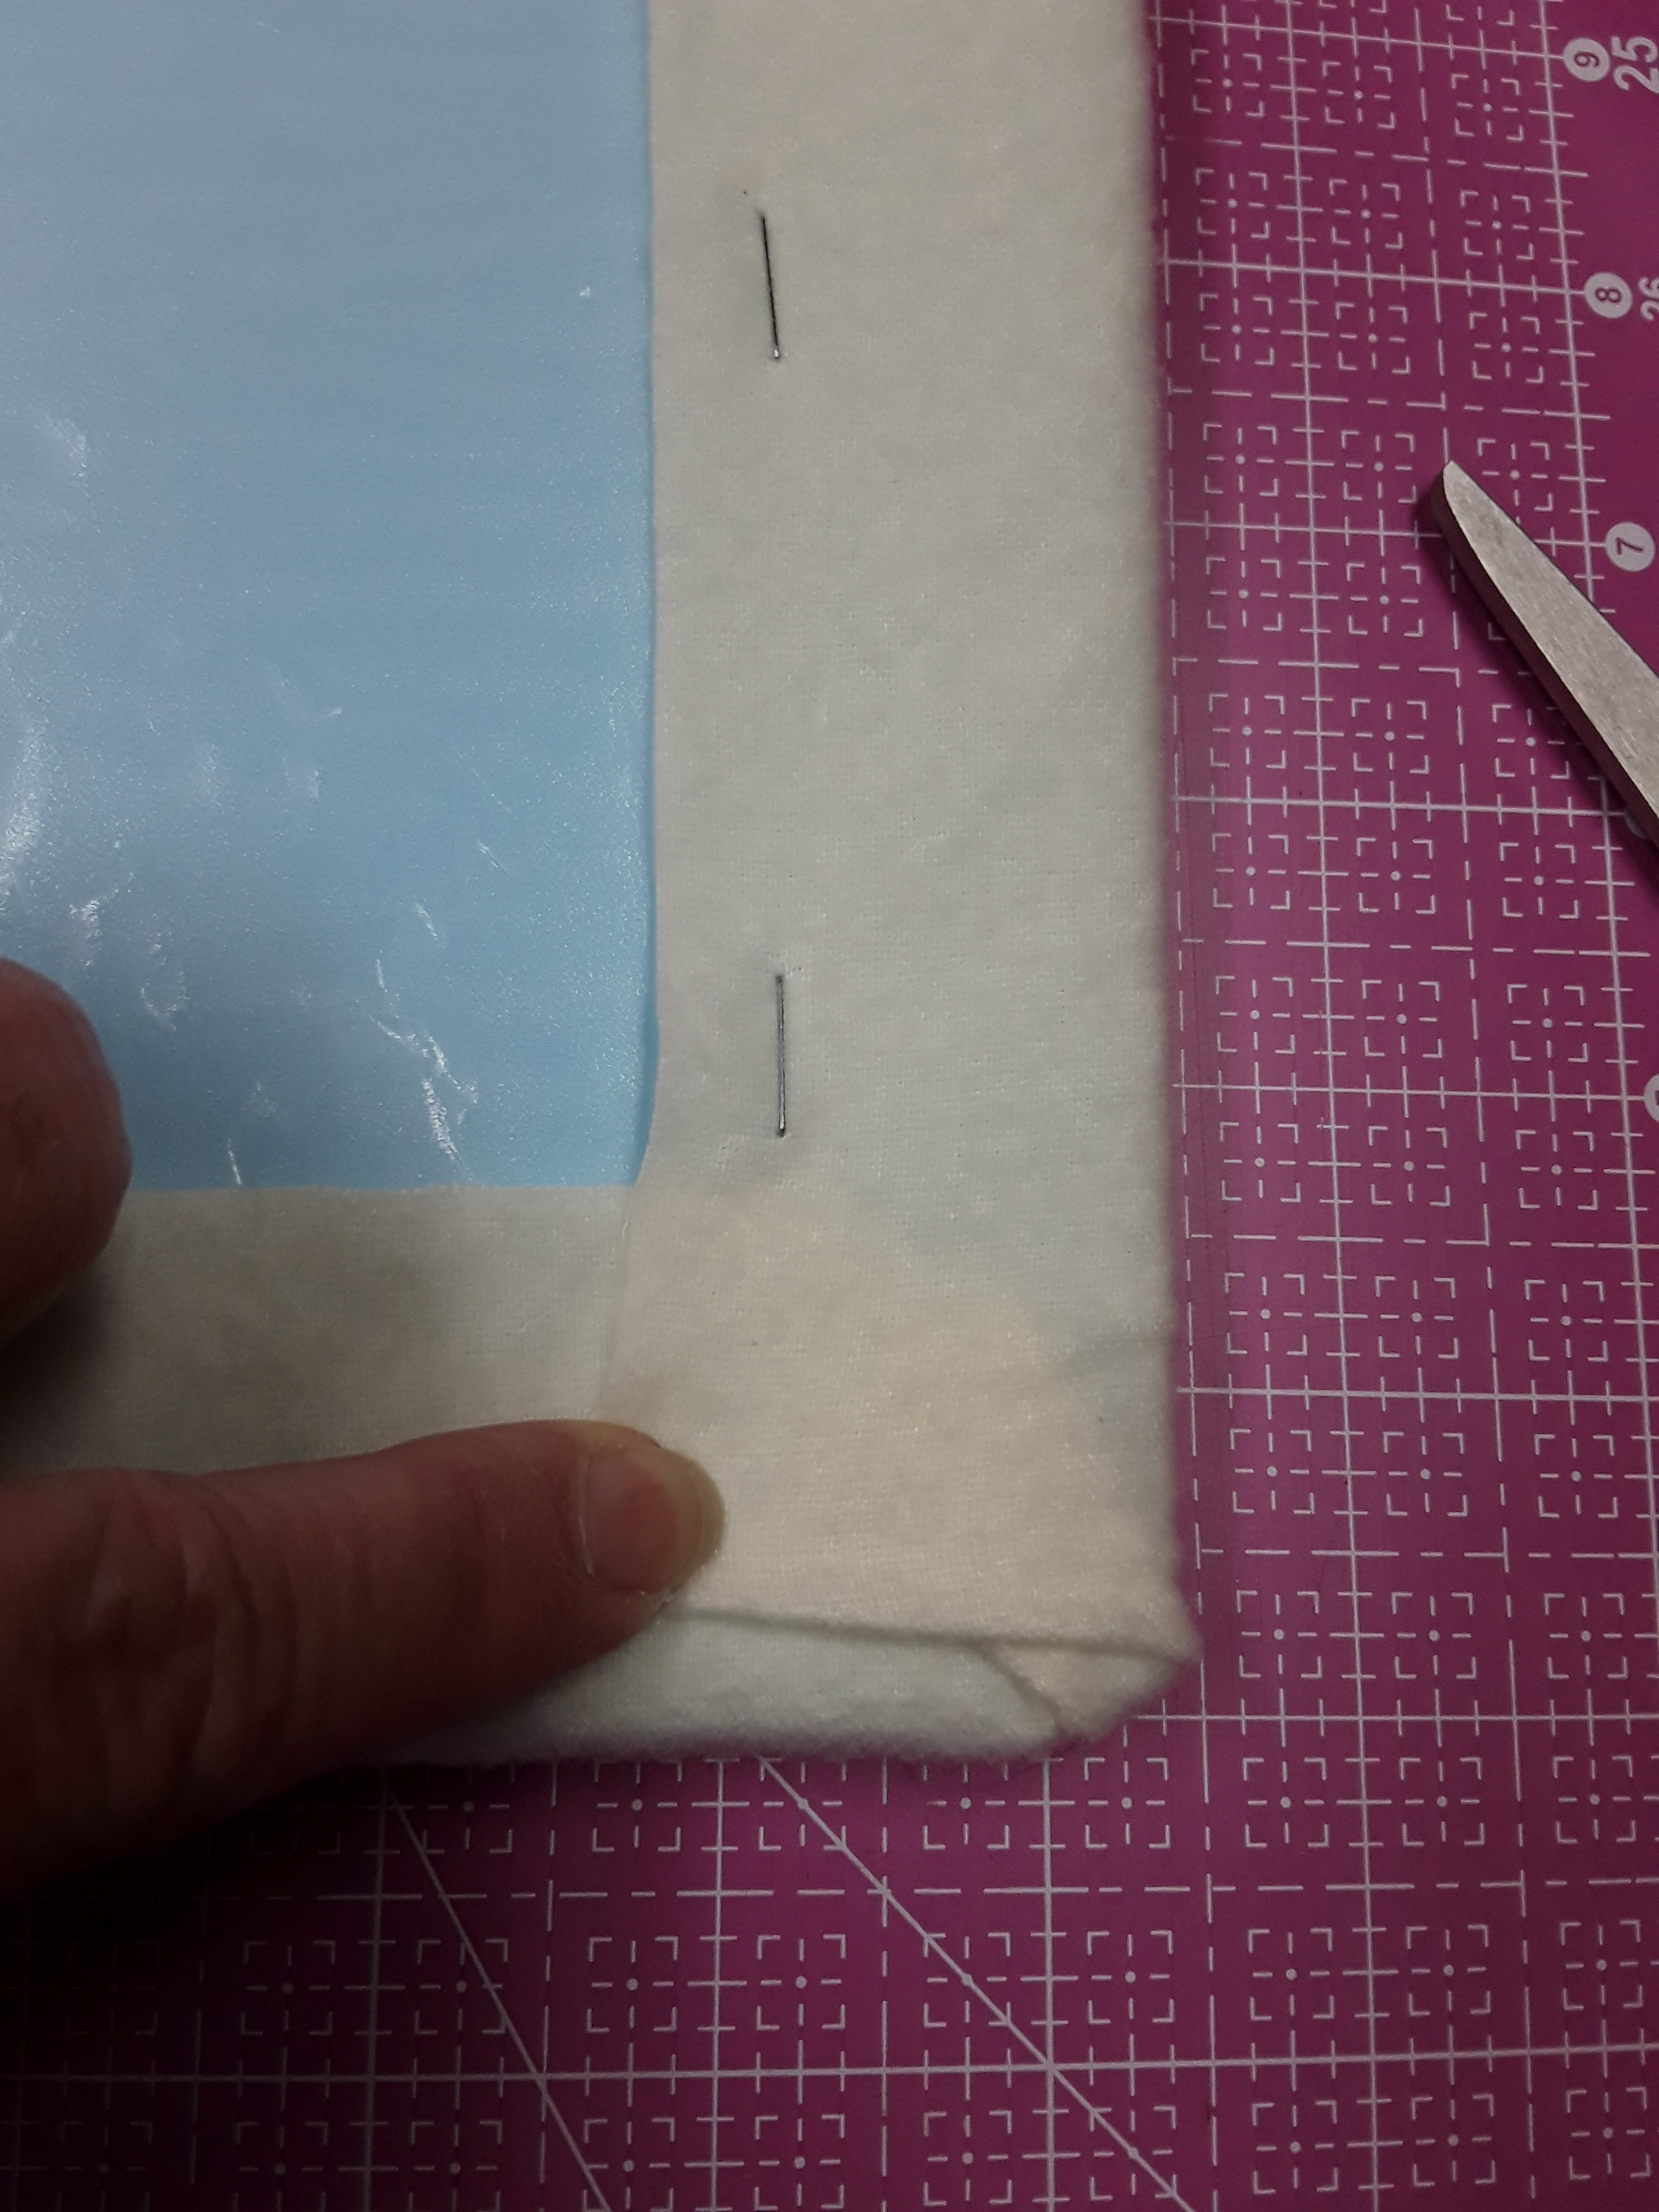
I’ve been working on a project left behind by a friend. The quilt has prairie points on the outer edge. I am trying to figure out what she wanted so I can pass it on to her daughter. Prairie points pointing in the quilt or pointing out beyond the edge of the quilt? I’ll see which looks best before I add the binding. The OOPS! She had the prairie points left in place with pins. I’ve had the quilt a couple years and I don’t know how long the pins have been in the fabric before I received it to finish. And look what happened…
YES, the pins rusted in the fabric. I am having to scratch off the rust to get the pin out of the prairie points. In some places, I’ve had to force the pins out of the fabric. Here is just a few I’ve taken out so far. In the trash they will go. I won’t just toss them in the trash. I will wrap them up so no one will get stabbed by them, just to be safe.
And….what is left behind….RUST
I will do my best to remove the rust from the fabric. Fortunately, many of the spots look like gold flecks that are similar to other fabrics in the quilt. I’ll have to give a report on the progress at a later time.
#1 – Do NOT leave pins in your projects/fabric. Same goes for needles!
#2 – When throwing away any sharp items (pins, needles, rotary blades, etc.) wrap them up, put them in an old plastic container or tape them to cardboard to cover the sharp points and edges. (This was a must when I lived in Egypt. Our trash was sorted by locals…recyclables from garbage. I always protected any sharp edges. I didn’t want anyone to get hurt.) Even here I’m careful. How many times have you pushed down items to get more into a bag? Care, always!
Today I would like to add more information about the method I used for making the Double Wedding Ring quilt for my nephew and his bride. I used Quiltsmart’s Double Wedding Ring fusible interfacing. Since I have made a couple other Doube Wedding Ring Quilts, I choose Quiltsmart since I did not have to sew curves. Can I sew curves? Absolutely! But, I had limited time and wanted to try Quiltsmart’s technique. Cutting square background pieces was easier than curved arcs and centers. The technique has you cut wedges, sew them together into an arc, sew the arc on Quiltsmart fusible interfacing, trim, turn fusible side out, fuse to the background squares, stitch (zigzag) arcs in place and continue! I will show the basics but do not want to give away any of Quiltsmart’s instructions. Mattie Rhoades Haines (owner/designer of Quiltsmart) has some videos over on the website and YouTube if you want to see her go through the steps. Their website is Quiltsmart. Took a look and shop!
My fabrics cut into wedges in the lid to keep them together and in reach.
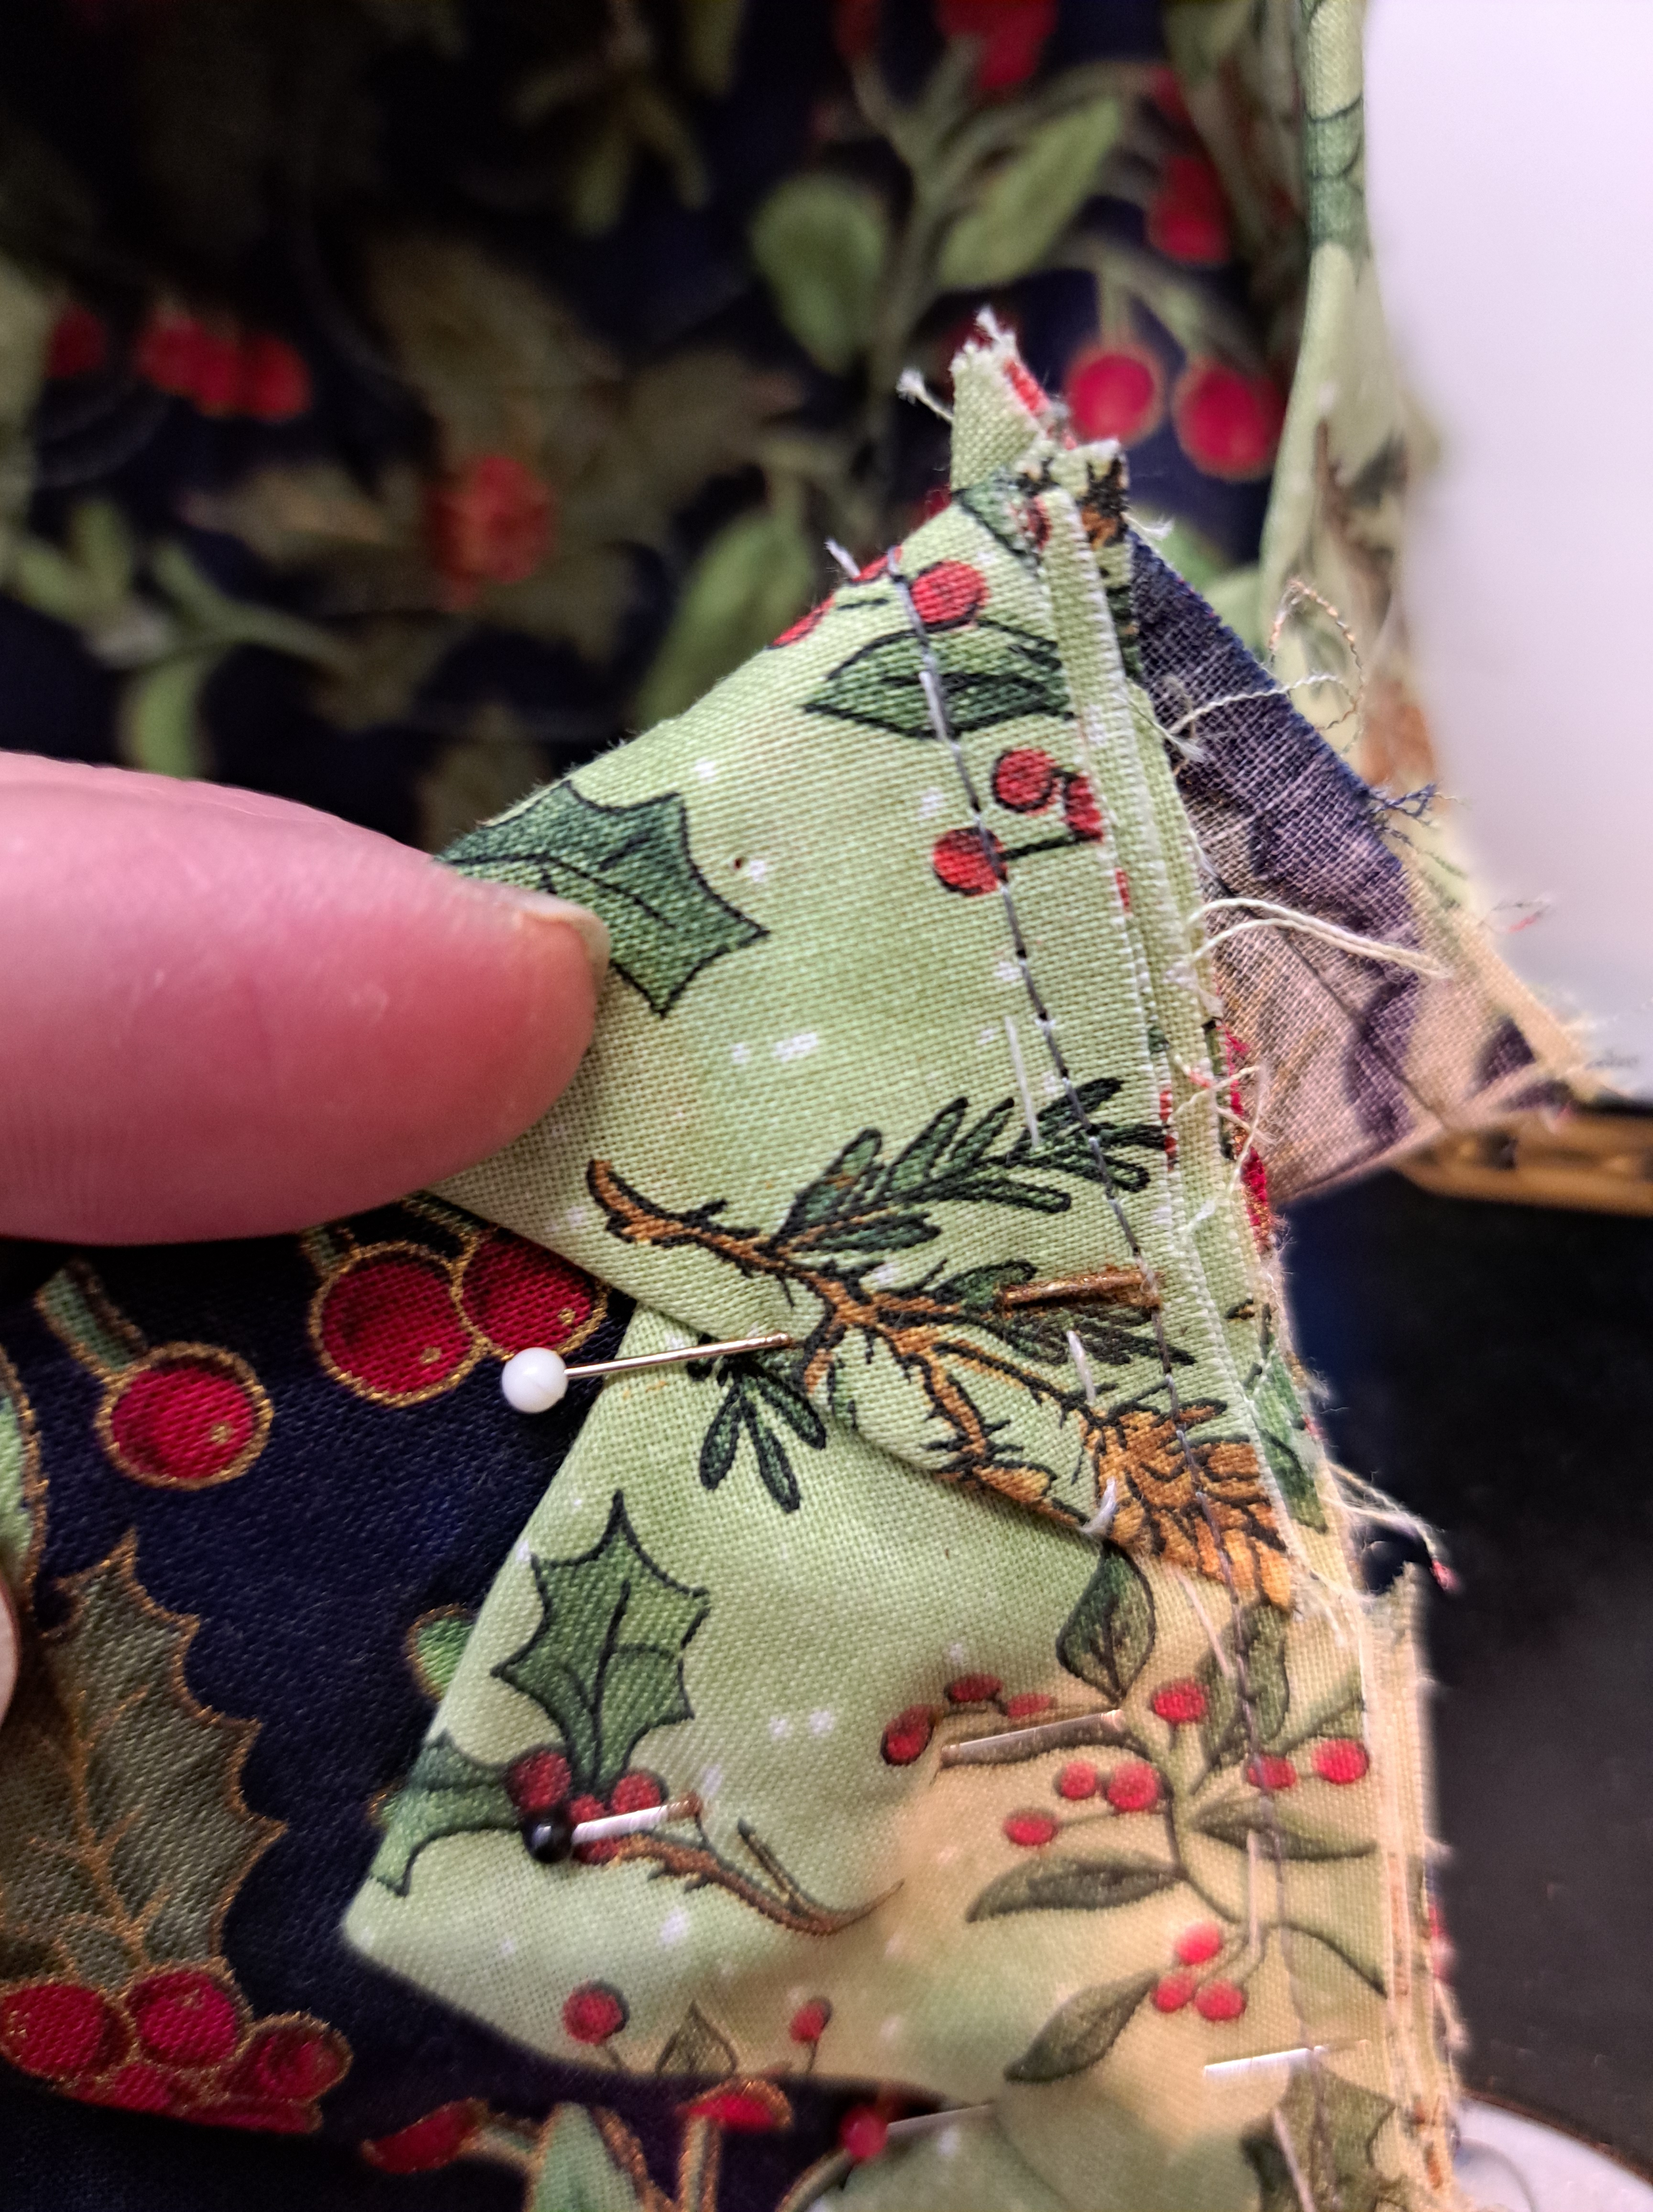
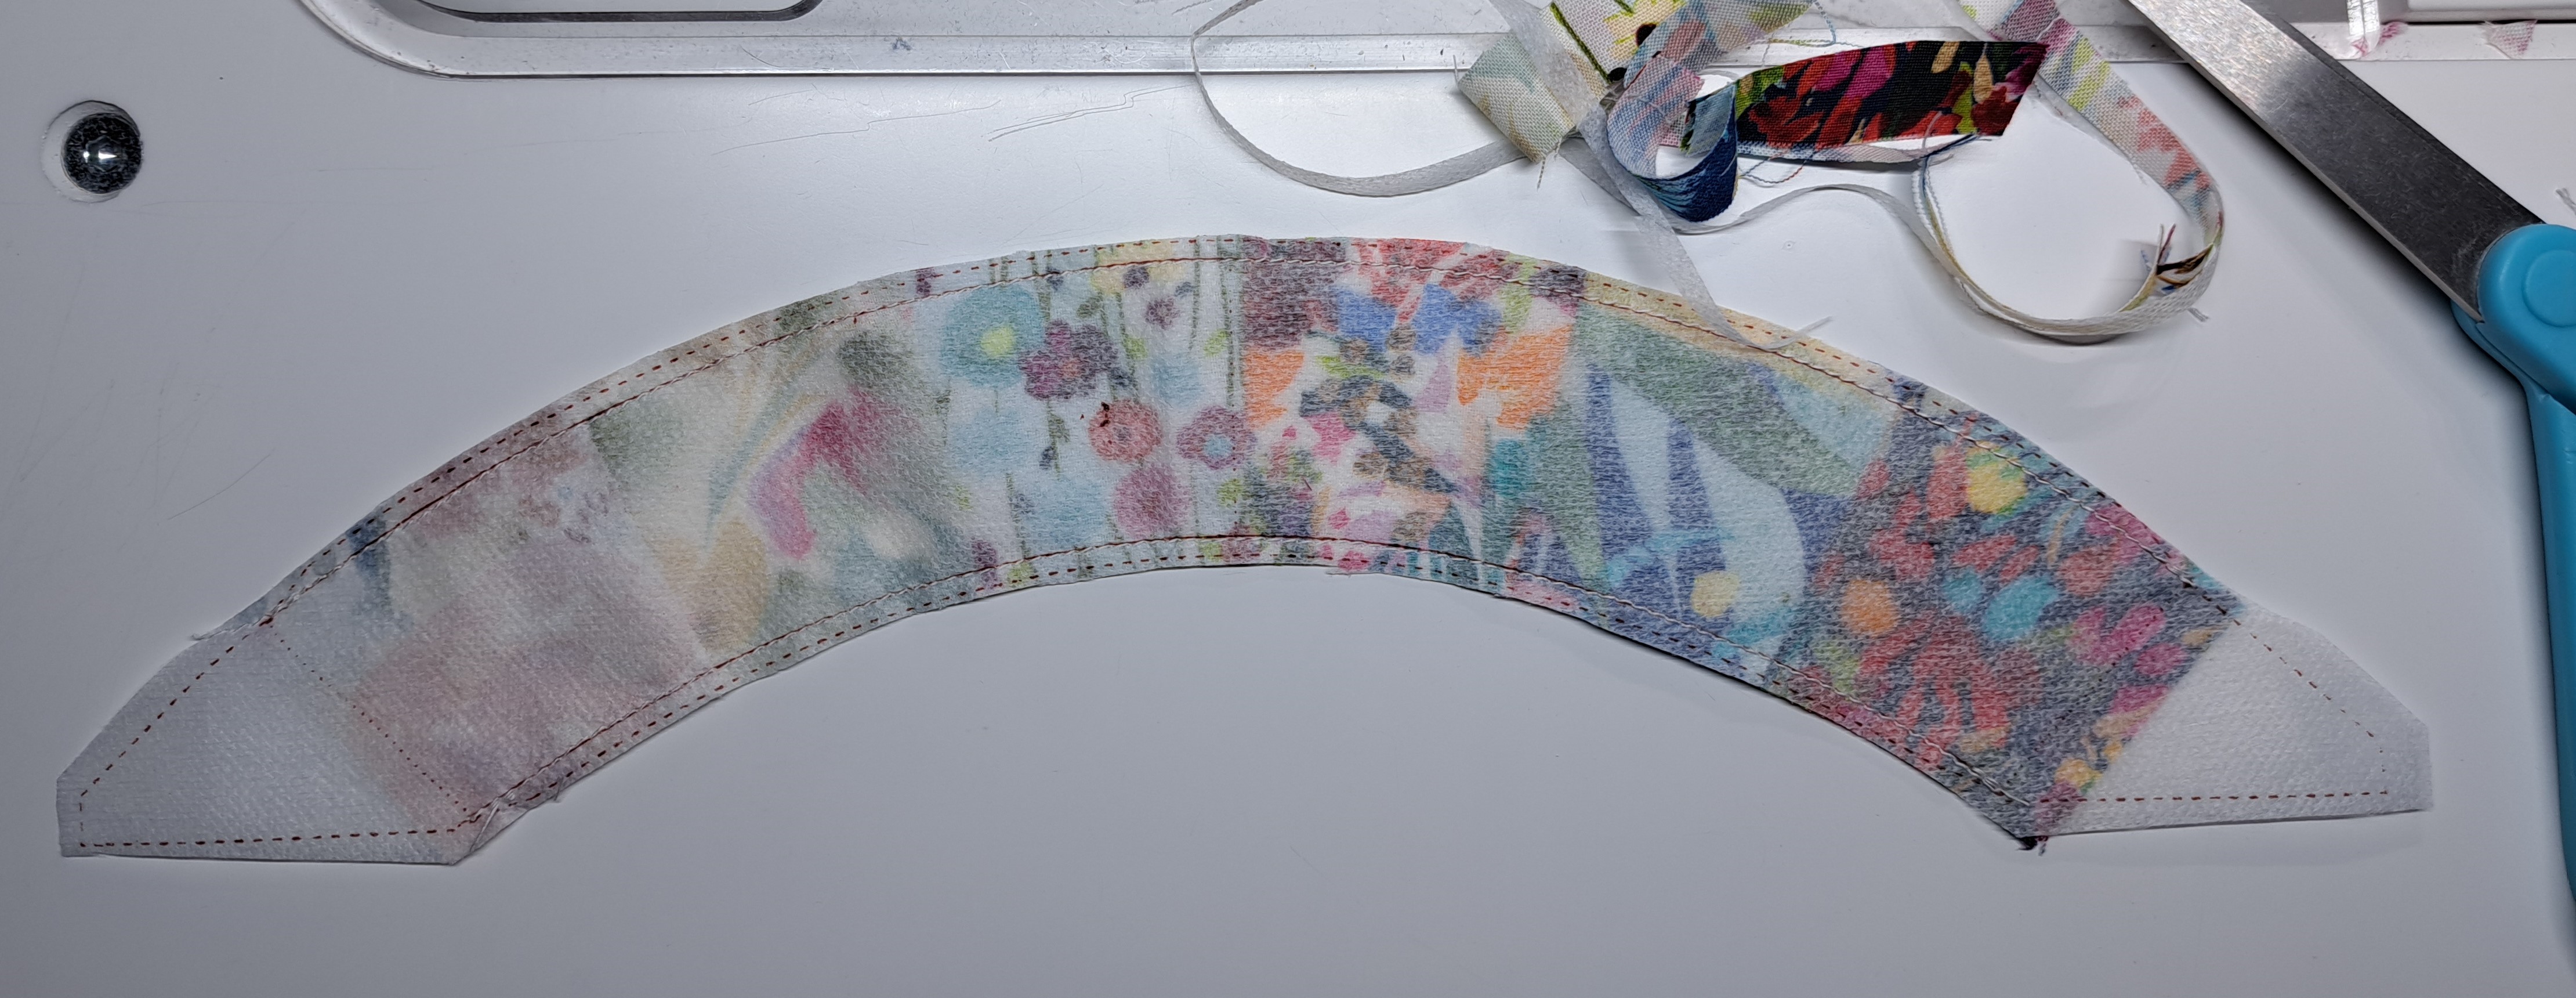
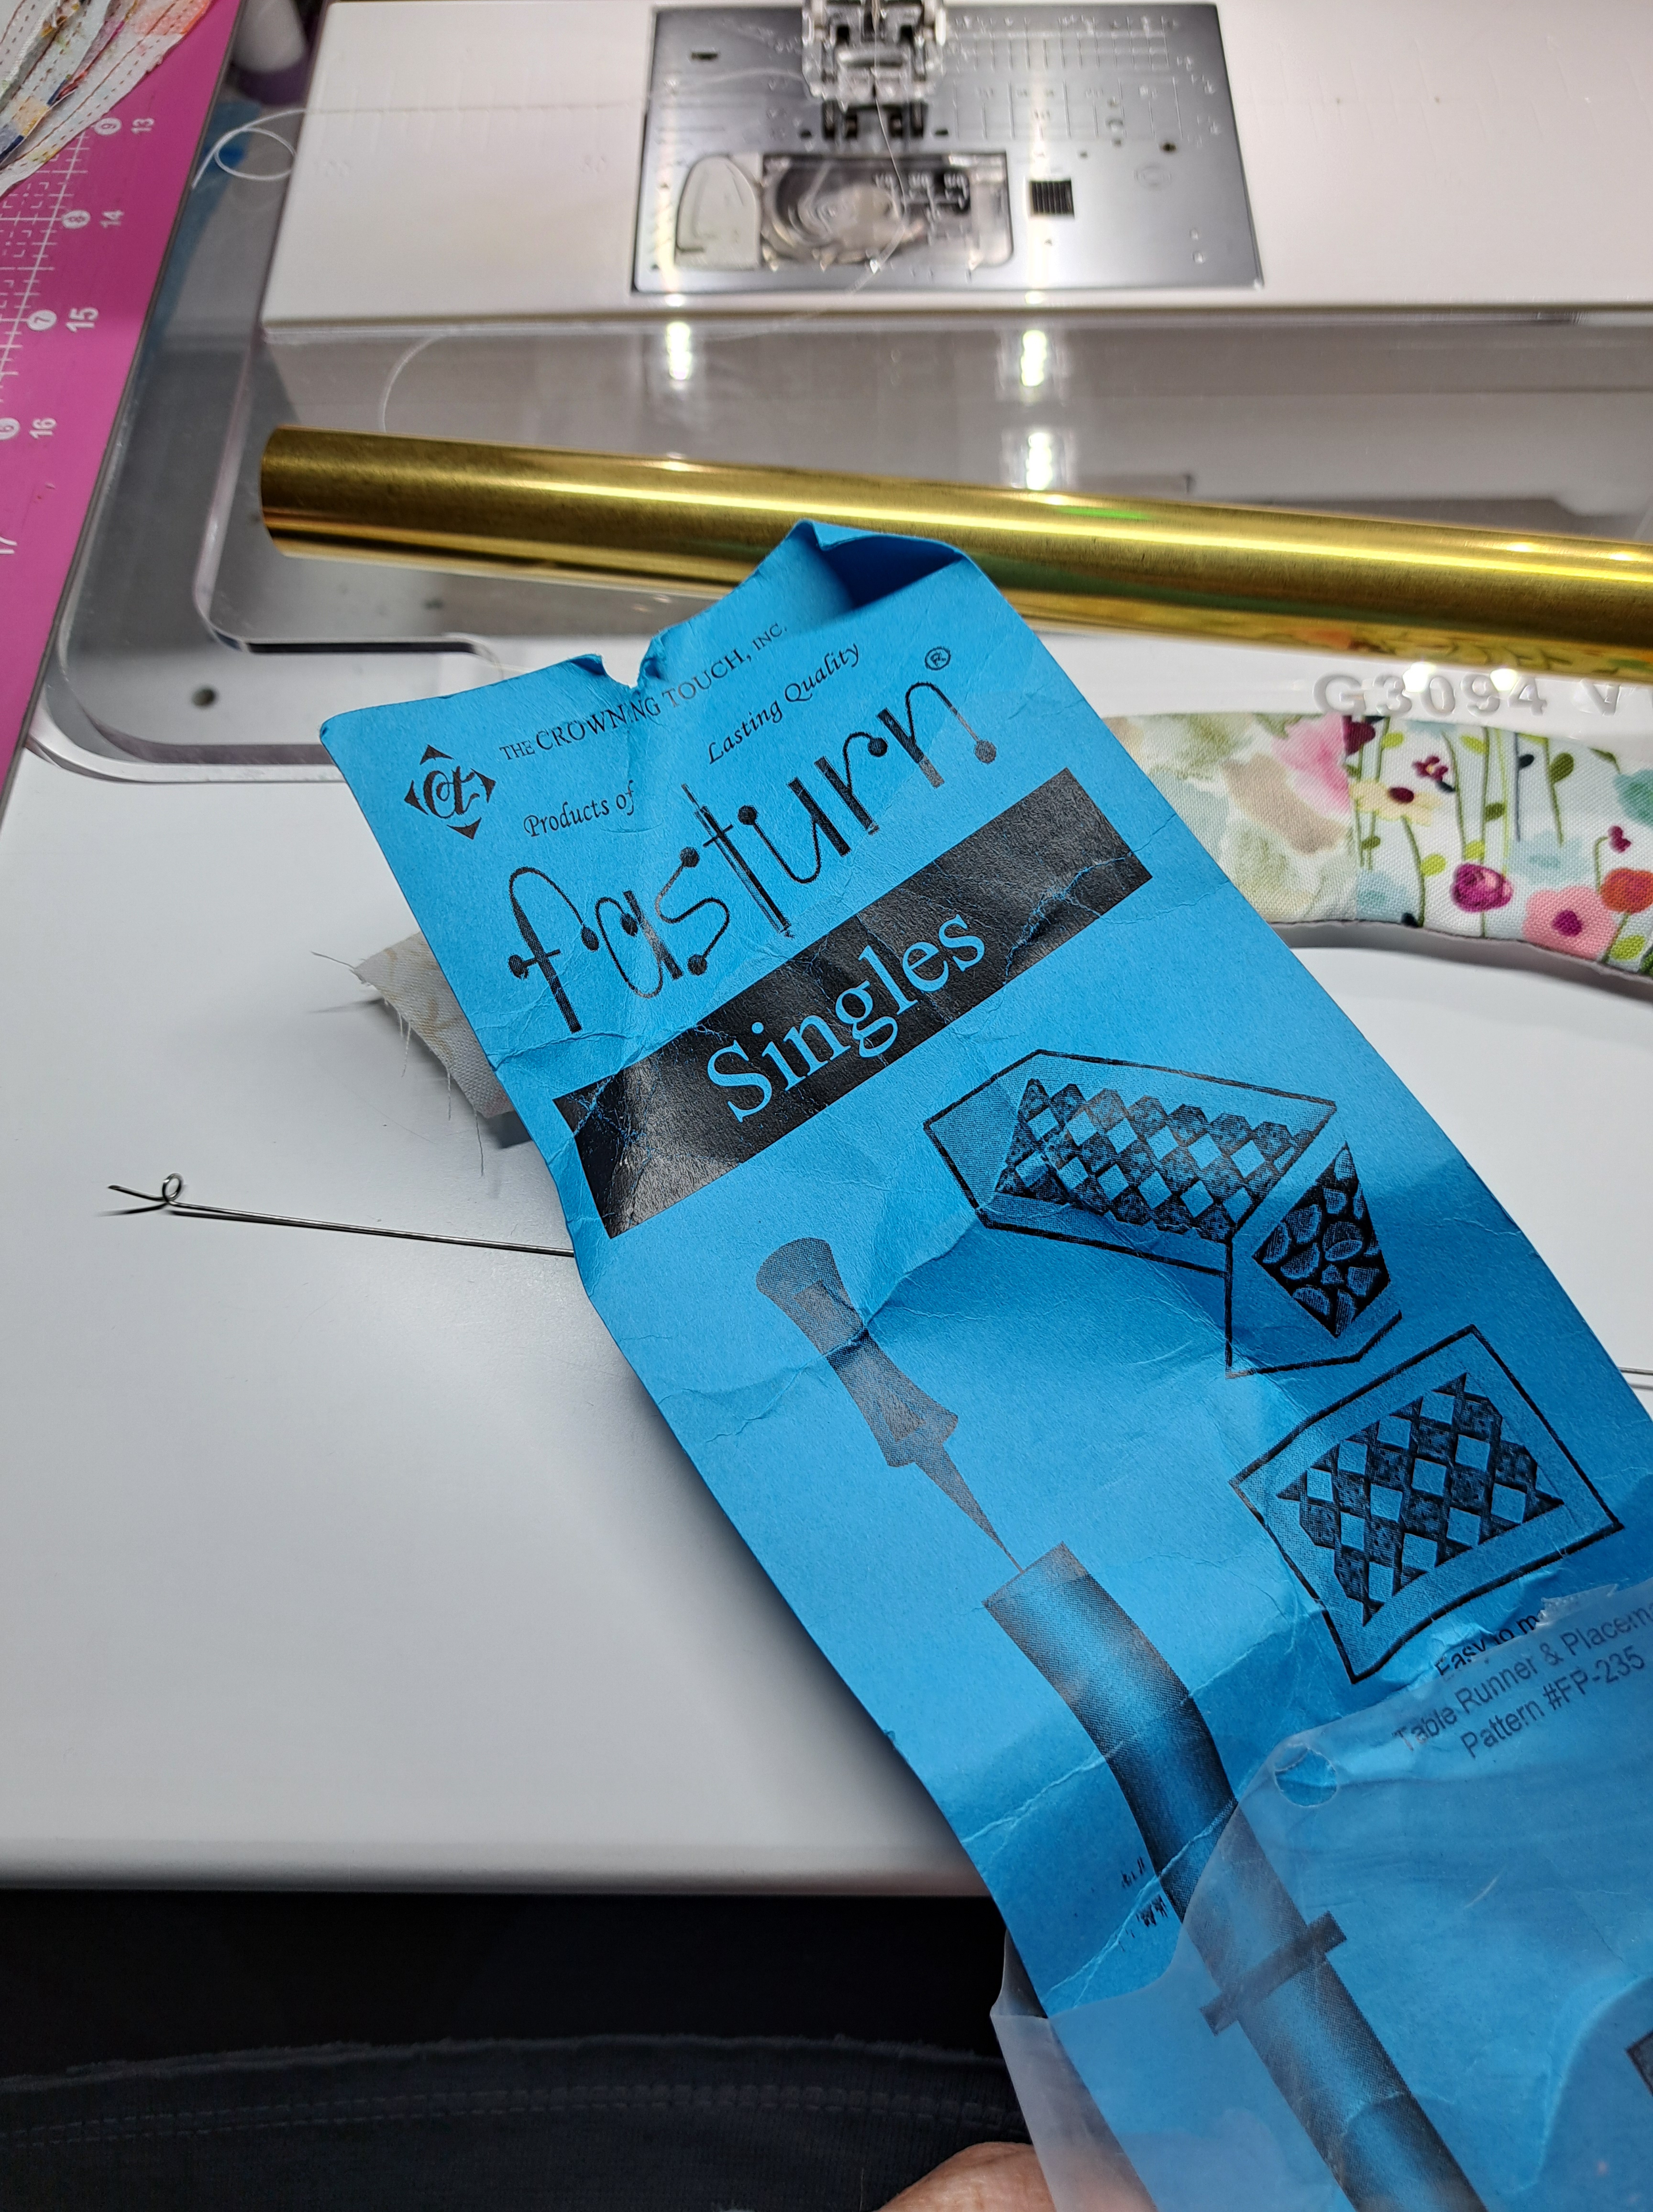
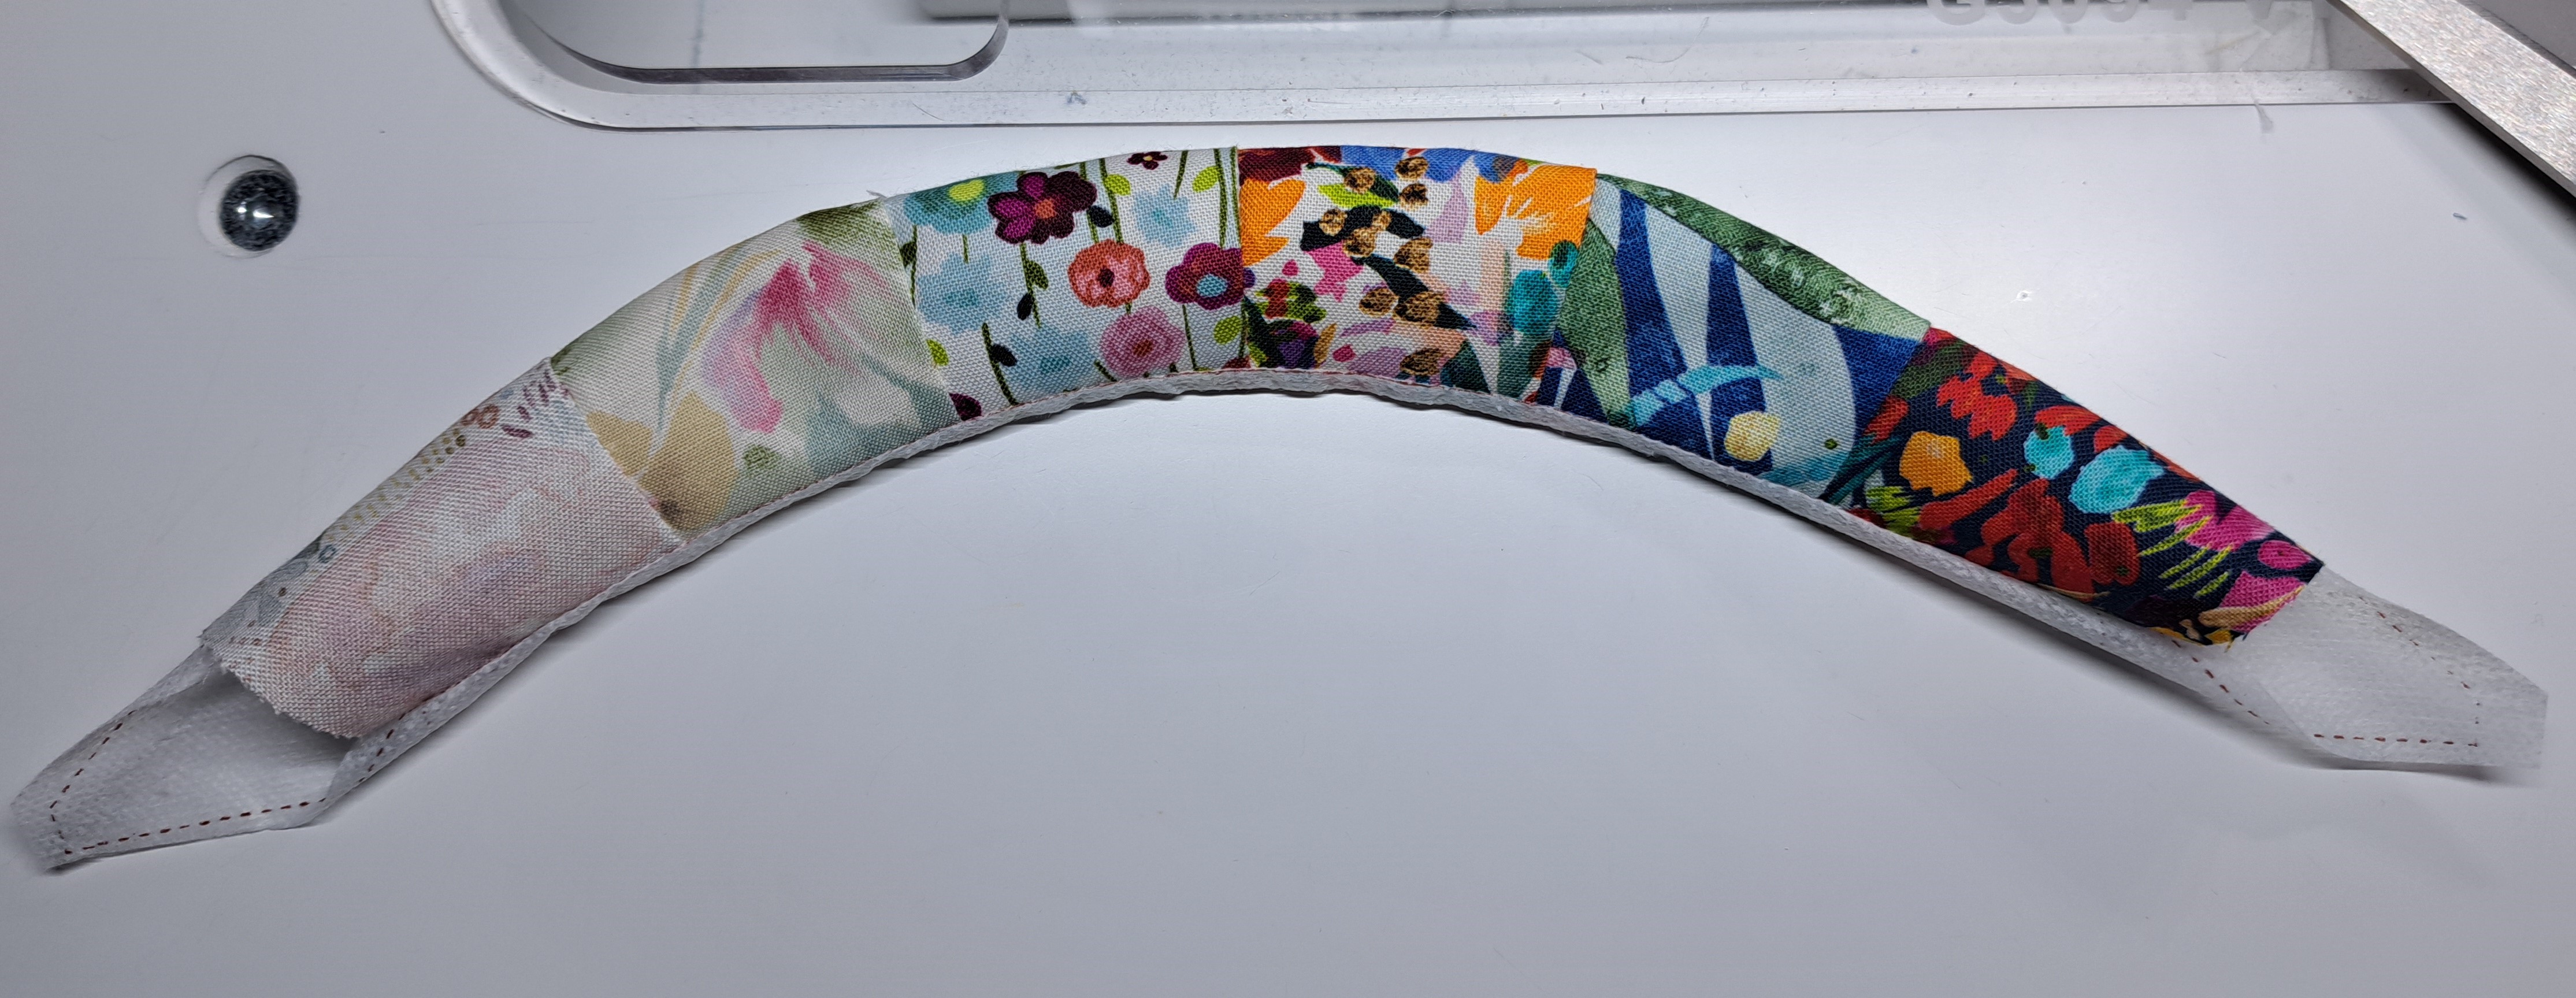
Sew wedges into arc and sew Quiltsmart onto arc. Turn fusible side out. I used the tube turner (Fasturn by The Crowning Touch) to easily turn.
Finger press (no iron….remember the interfacing has fusible!) Arrange on square background. Now you press in place. Zig zag to attach arcs to the background. Repeat for all four sides and all blocks!
This is a fun technique. It was less stressful than sewing curved seams. Give it a try!
#1 – Keep pieces organized in a box lid!
#2 – Finger pressing is necessary in some projects with fusible. No iron until the pieces are in place.
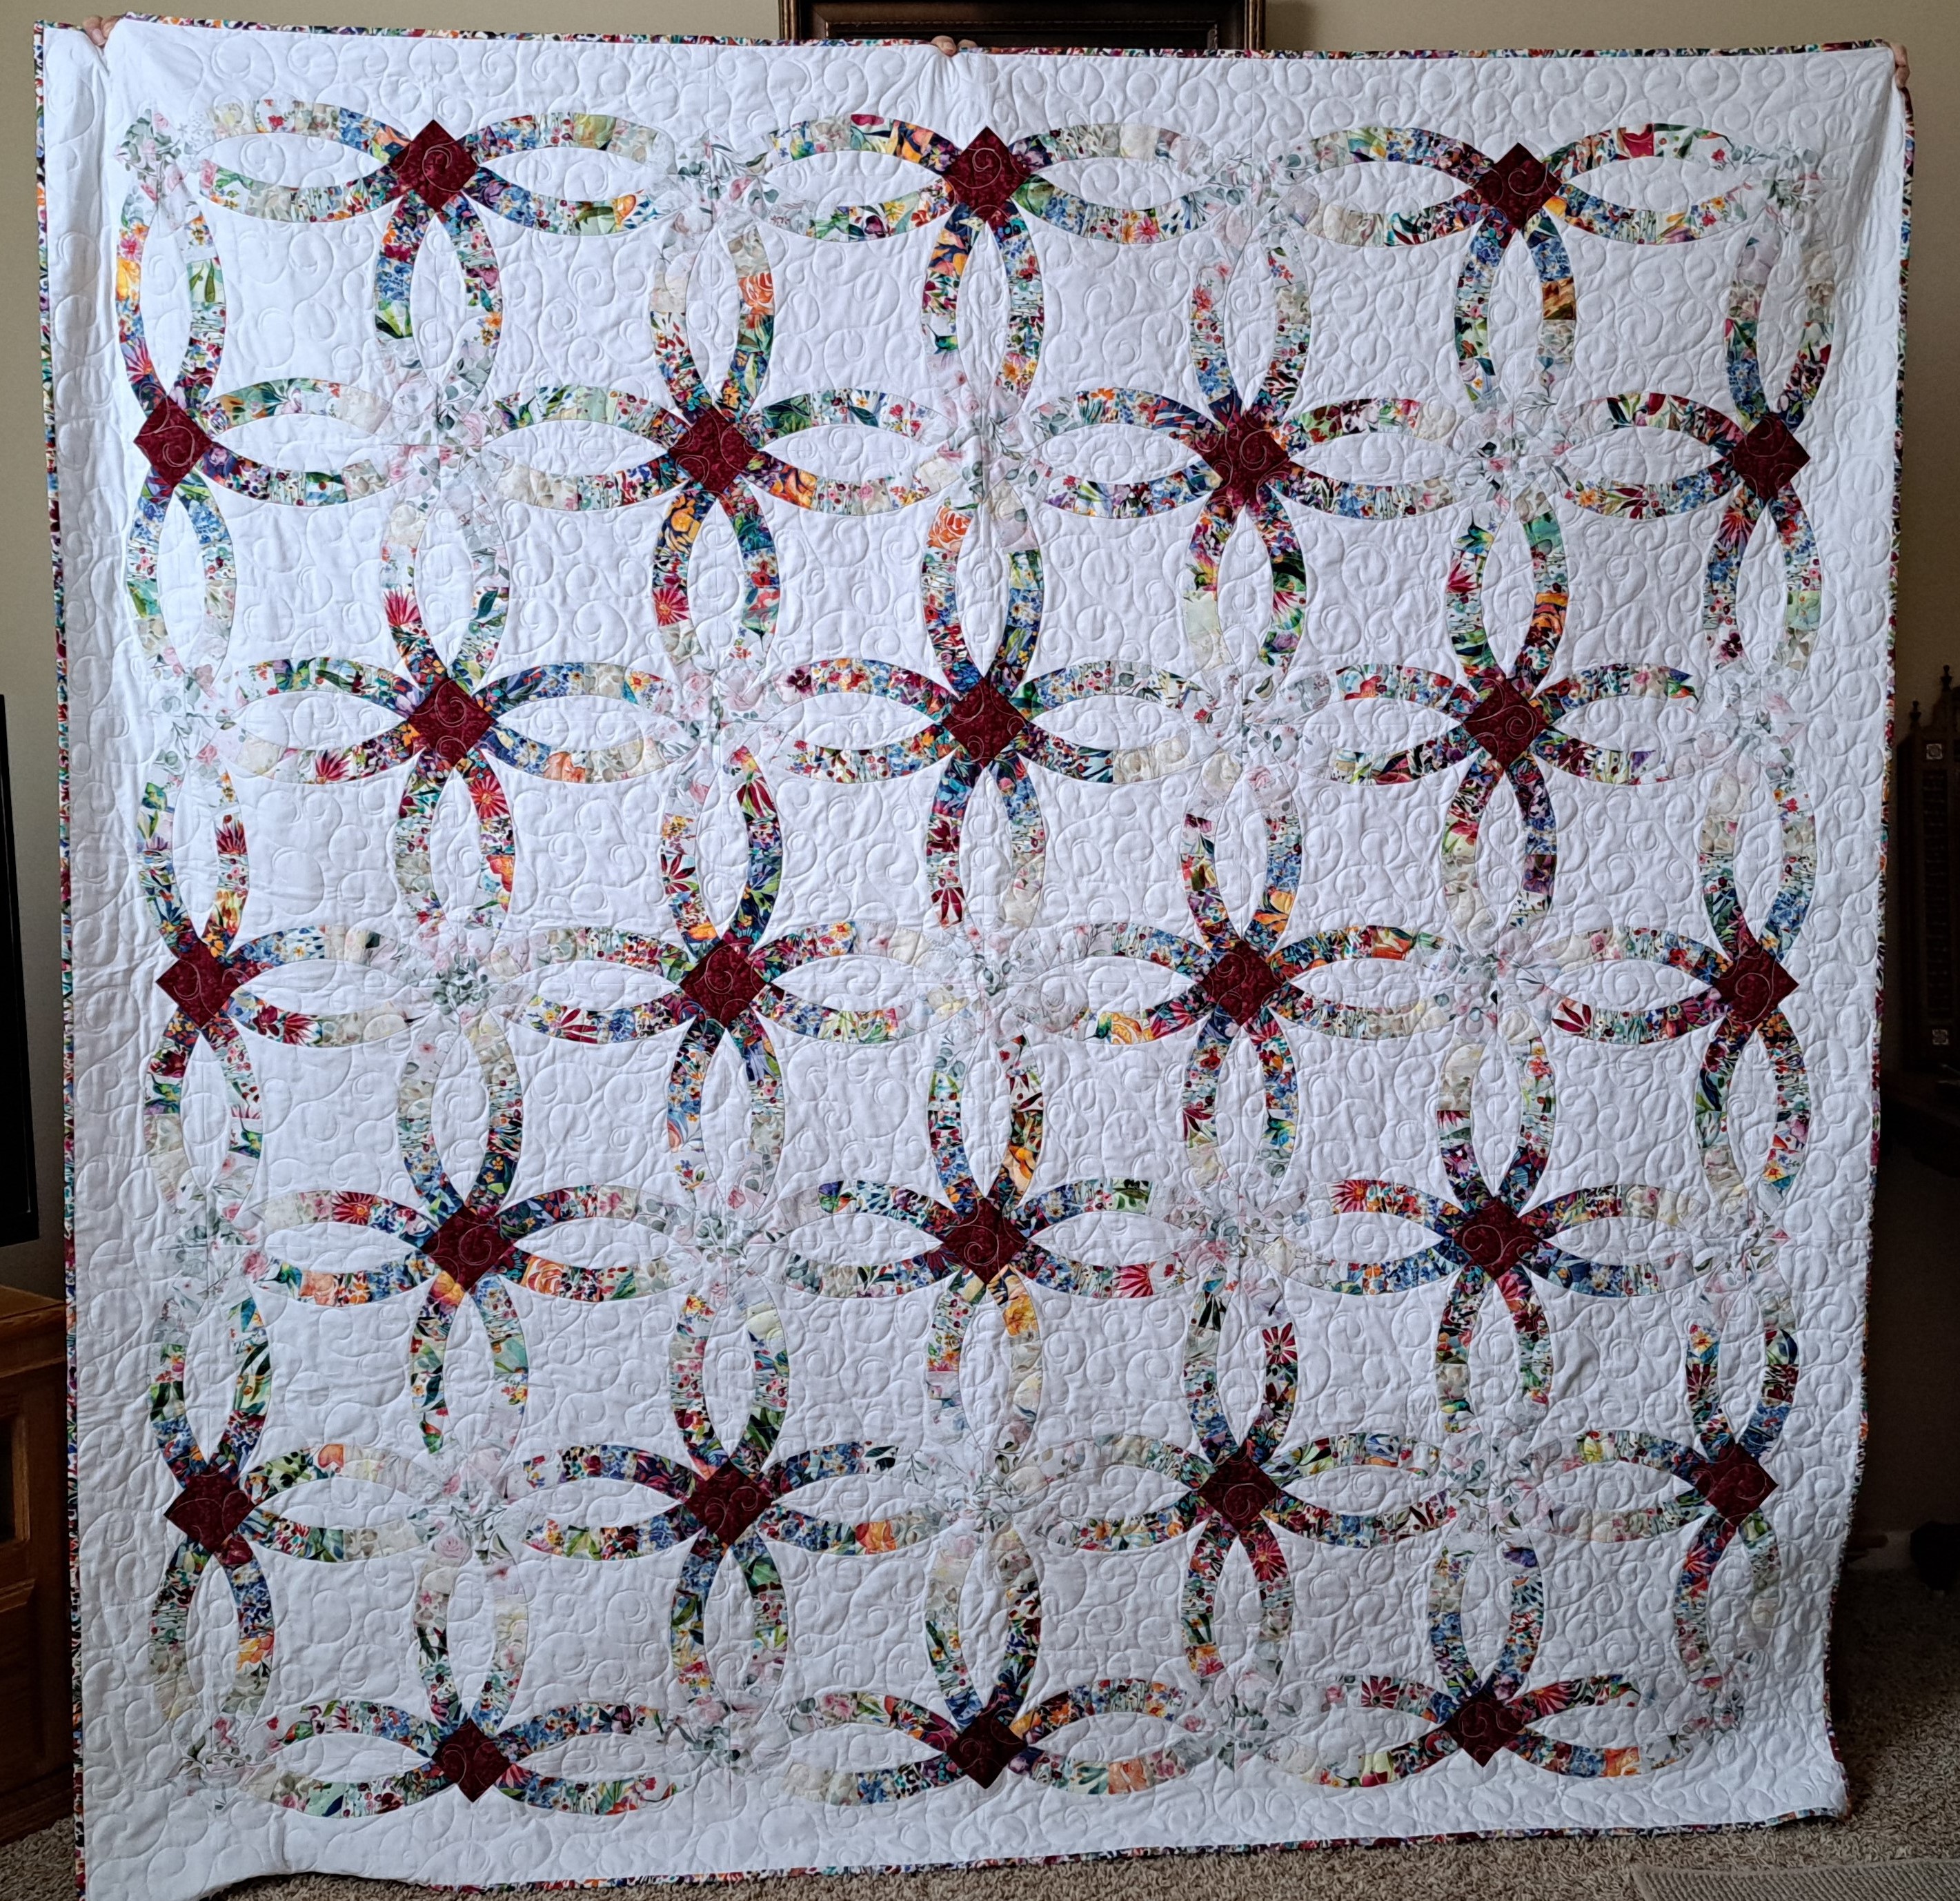
I was on a plane yesterday getting home since my flight was cancelled on Monday. HOME! The ice and snow in Kansas City, MO and all around the metro was crazy. Thank goodness my nephew’s wedding happened the day BEFORE the ice started!! His wedding quilt, a double wedding ring, was my last finish off 2024 and thus the first given for 2025. Andrew and Hannah had a beautiful ceremony!! The quilt I made for them is below…
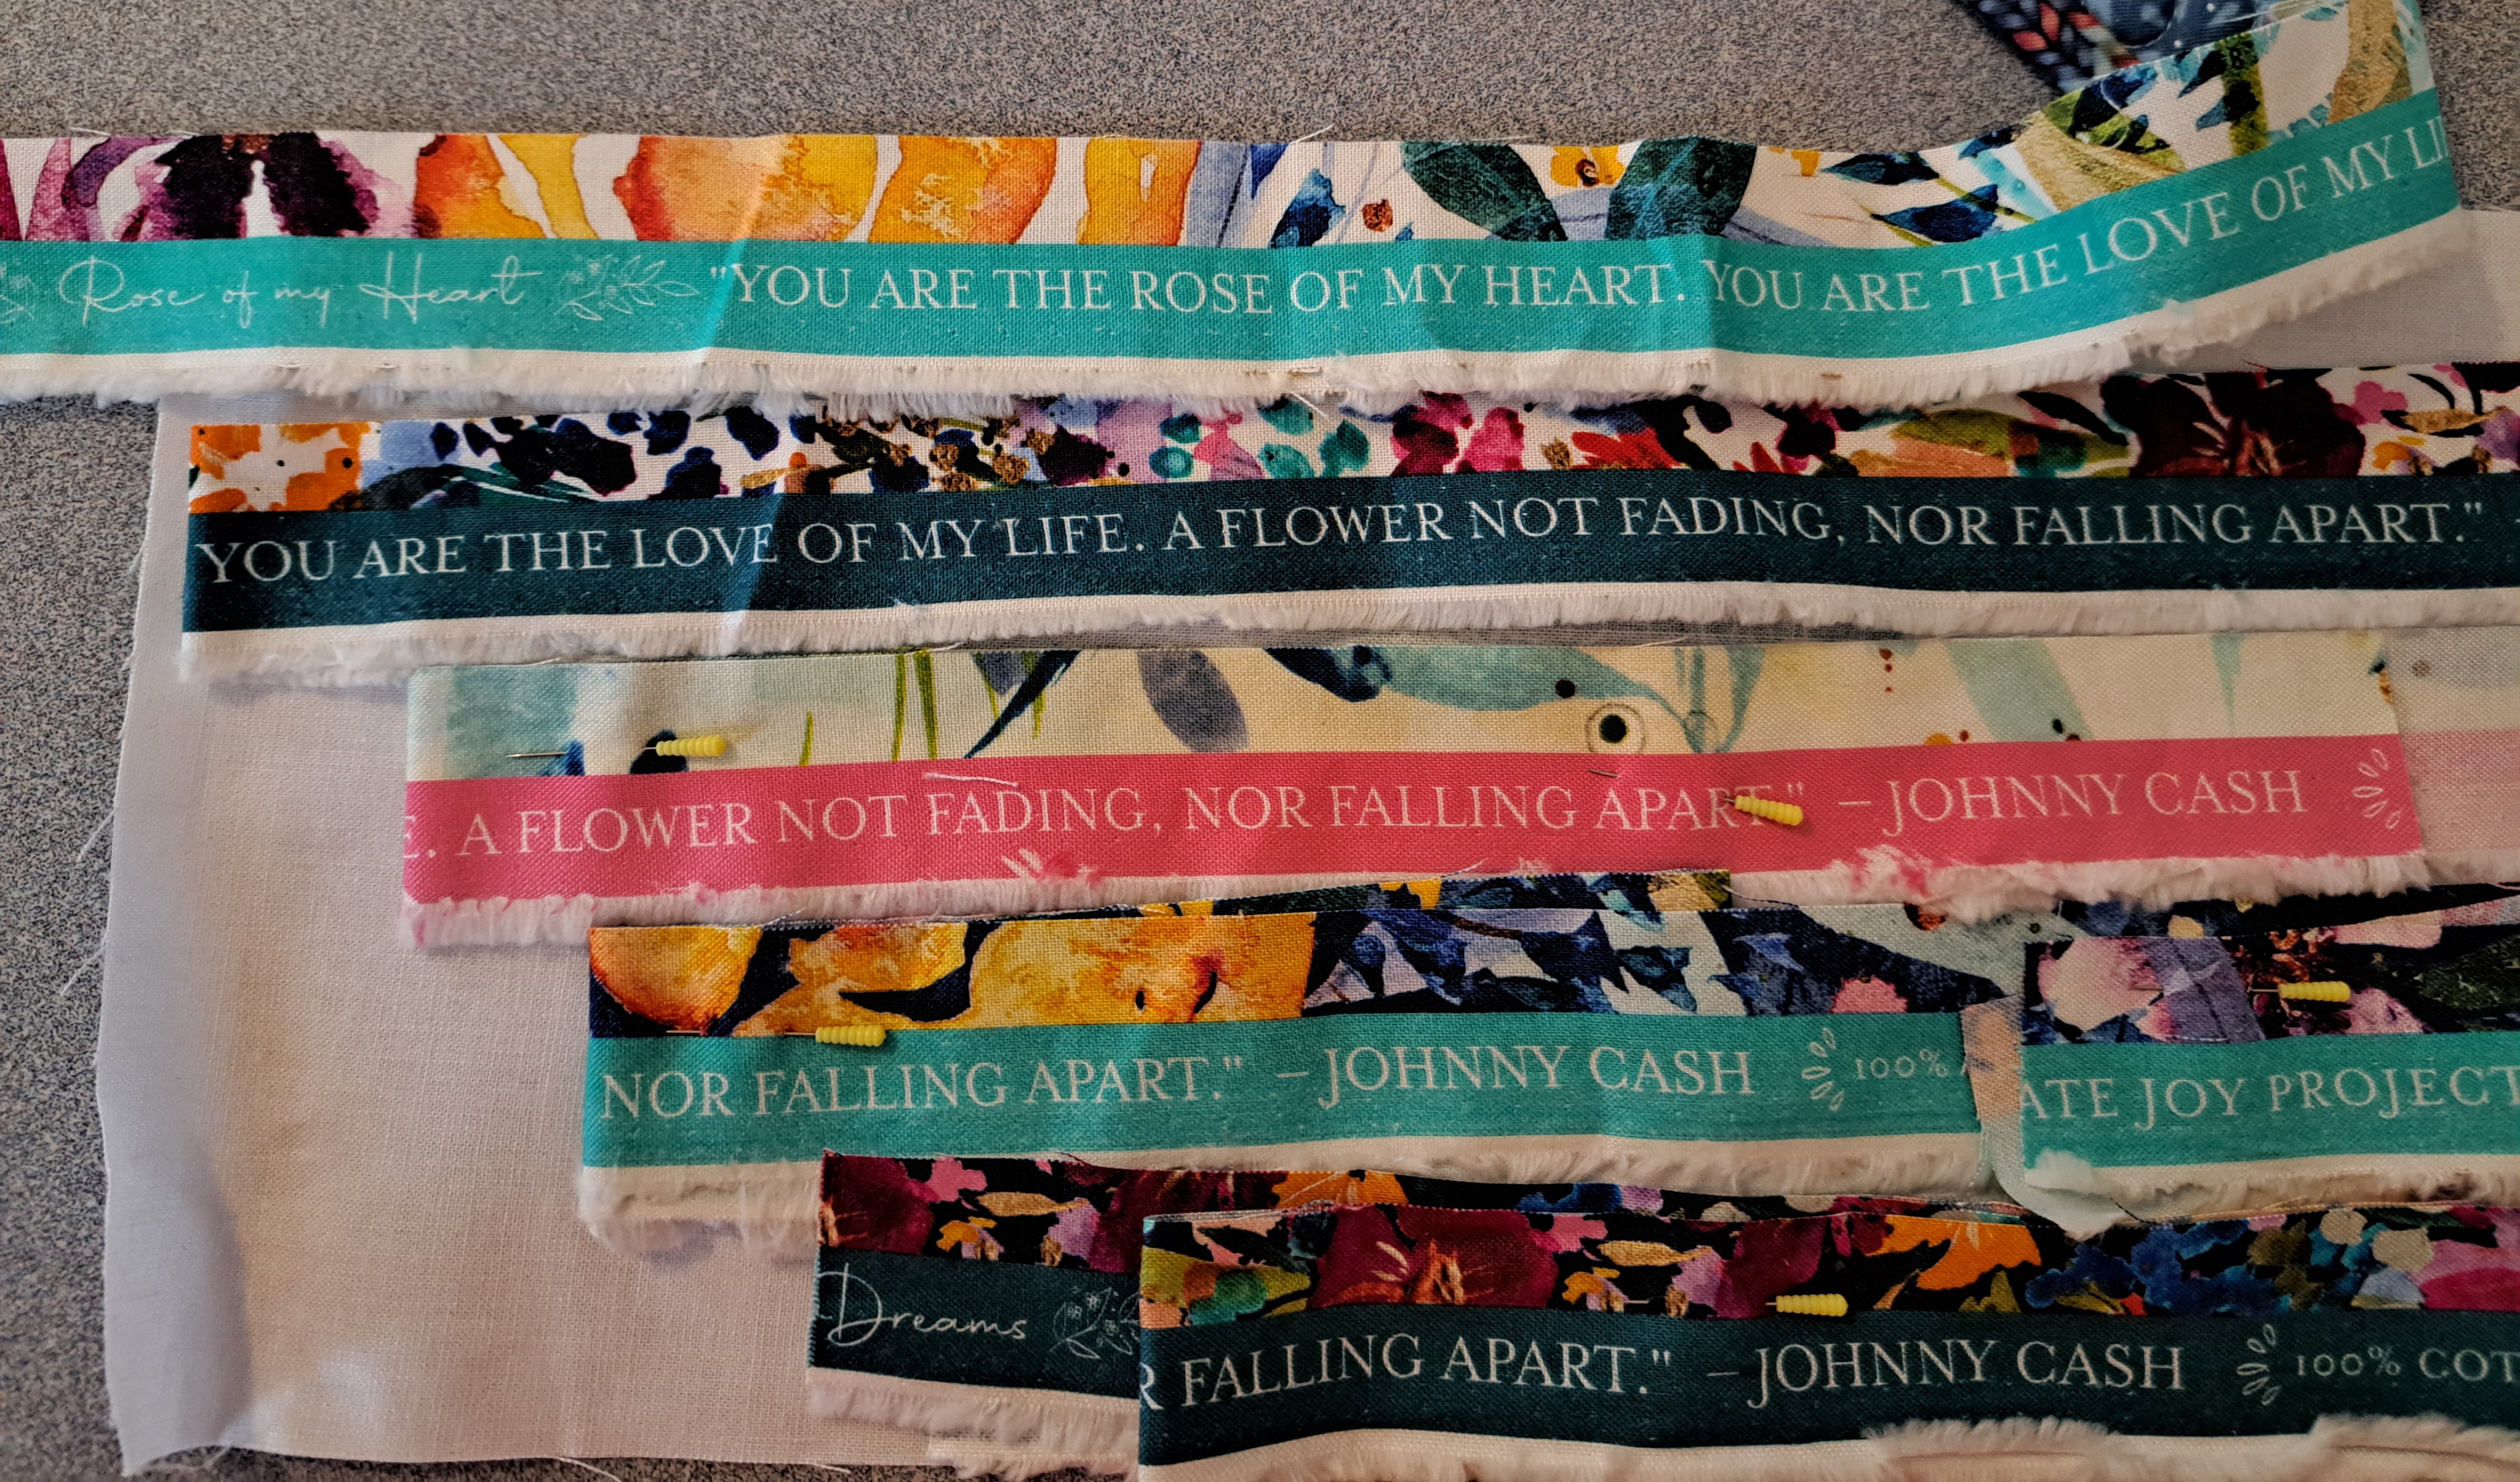
They requested a double wedding ring quilt. Hannah loves flowers and sent a photo of one she found on the internet that shaded from dark to light, all florals. Finding just the right fabrics took some time. I used the words/song/poem from the selvages of several fabrics that were all from the same fabric line on the label. Create Joy Project by Moda Fabrics. The saying is
You are the rose of my heart. You are the love of my life. A flower not fading, nor falling apart. ~Johnny Cash
The selvages are below with a bit of the fabric still above the selvage. The label I made is also below. I erased the date and last name for posting.
I’ve made several double wedding ring quilts. My brother and sister-in-law got the traditional – all pieced and all curved melons and centers. A niece got the traditional look with solid fabric rings, also curved piecing. I choose Quiltsmart to make this double wedding ring. You piece wedges and add them to the Quiltsmart foundation, stitch, turn and fuse onto background squares. I saved time, not stitching curved seams. However, I did have to stitch the fused arcs to the background. I used a very small zig zag stitch. (I started to do a blanket stitch, but it takes much longer to sew. Plus, Quiltsmart recommended using the zig zag stitch!)
I’ll continue telling you about the quilt and process next week…..
#1 – Quiltsmart is a wonderful product to use for making a Double Wedding Ring Quilt. Other techniques I have used is John Flynn’s Double Wedding Ring and Marti Michell’s Double Wedding Ring Template Set. All are great! Each have their benefits!!
#2 – Check out selvages! I found the song/words along some of the fabrics I used and they worked perfectly for this wedding quilt!
As I sit and write this on New Year’s Eve, I realize I forgot last week. Oops! Things happen during the holidays and I was in the moment of Christmas Eve last week. Actually, traveling! We, my husband and I, have almost always traveled on Christmas Eve or Christmas Day. Getting to see both sides of our families is our present to ourselves. I hope your holidays have been happy, healthy and blessed. I hope Santa brought you treasures.
Ringing in the New Year can be happy and sad. What did happen or get made and what still needs to be done. Either way, time just keeps moving along. Reflect on what you have done and celebrate. What awesome things do you look forward to doing? Will you pick a word or phrase for 2025? I usually think about it, then not worry about it. I have some new patterns running around in my head. It will be fun to work them out and get them out there. Coming up first for 2025 is Quilt Week in Daytona Beach in February. I hope to see you there and in class! You can register and see all the events HERE. Become a Brilliant Binder is sold out. The two classes below still have openings!
Tips for year’s end…
#1 – Celebrate your finishes!!
#2 – If it didn’t get done, treat yourself to TIME to finish! It will feel great to be done.